JP1 - Just How Easy Is It?
- (For the original KM version, click here)
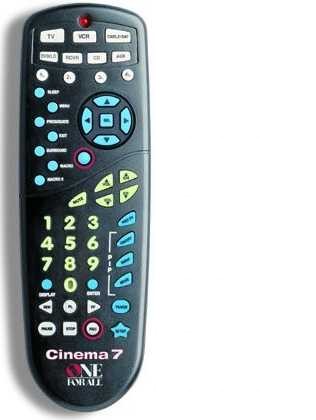
JP1 is a home-made process that you can use to re-program your UEI remote (ie, One For All and Radio Shack, and other brands) from your PC. Not only does it allow you to manage your macros, etc in a much easier way than doing it on the remote itself, it also lets you customize the remotes in ways not previously possible and it lets you add upgrades which let the remote to control devices it would not otherwise control.
Why Do I Need JP1?
If you have a JP1 compatible remote, but it doesn't control all of your devices, you need JP1 so you can add upgrades which will let your remote control those devices. While some UEI remotes are equipped with modems that allow you to download upgrades over the phone (or web), this only works if UEI has already developed an upgrade for your un-supported device. With JP1 you don't need to wait. In most cases, someone else has already developed an upgrade that you can use, and even when there's no upgrade available, you can easily create one yourself, as I will describe in this document.
Some newer JP1 remotes equipped with a USB port are programmable over the web. But even these models also benefit greatly from JP1 tools, especially as some of the official websites have closed down, like ez-rc.com
What Equipment Do I Need?
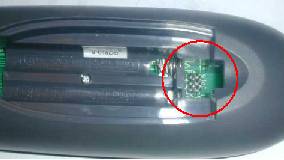
Well, for starters, you need a JP1 compatible remote, these are remotes made by UEI. The two main brands that you will find in the stores are 'One For All' and 'Acoustic Research', but there are several other remotes out there that are also JP1 compatible. To see if your remote is JP1 compatible, open up the battery compartment and see if there's a 6-pin connector in there (like the one below). If you see 6 holes rather than a 6-pin connector, you remote probably needs extra parts to be JP1 compatible. Some newer JP1 remotes like Xsight, Nevo and Simple have a USB port instead of pins or even Bluetooth connectivity.
Next, if your remote has pins, you need a JP1 cable (unless you have a Bluetooth remote). If your remote has a USB port or Bluetooth, then you don't need a JP1 cable and can skip to the next section.
There are currently two types of JP1 interfaces - referred to as simply 'JP1' for the older style interface and 'JP1.x' for the newer style interface. All remotes made in the last 10 years or so are JP1.x.
You can determine which version you have by referring to the remote control spreadsheet available here: Remote Chart
The best way to get a JP1.x cable is to get a FTDI or Prolific cable on eBay and just replace the connector with a 6-hole DuPont connector.
Windows, Mac and Linux based machines are all supported at this time.
Finally, you will need the Open Source RM/RMIR "Remote Master" software, which you can download from Forum Index -> File Section -> JP1 File Section -> Tools -> Main or directly from the SourceForge project.
How Do You Use RMIR
First, lets get to know the terms, you will hear "Remote Master", "RMIR" and "RM". "RM" and "Remote Master" are the same thing, this is the program that you use to edit and create device upgrades. "RMIR" is the program that you use to communicate with your remote, which includes downloading the current memory, adding macros, device upgrades and other improvements. RMIR and RM are both part of the same "Remote Master" program. When you edit a device upgrade in your RMIR profile, you are using an instance of RM.
Anyway, now onto the details...
RMIR is the program that you use to configure your remote and create/manage device 'upgrades'. You can use it to download your current programming, you can save a copy of your current programming on your PC as a backup, you can make changes to the programming, including adding upgrades, etc and you can re-load it to your remote.
Installing RMIR and preparing it for use
Most modern operating systems include Java by default. It's built into Mac OS X; most modern Linux distributions (e.g., Ubuntu and its derivatives) either include it, or an option to install it; and Microsoft has included it in recent Windows versions. If your OS does not include Java, you may download it free from Oracle. (Note: Early adopters of Mac OS X 10.7 'Lion' will need to download Java separately from Apple.)
Once you have installed Java (or have confirmed it is already installed), download the program as shown above, and unzip the contents of the file into a folder on your computer.
For Windows machines, we recommend that you create an "RM" folder under "My Documents", but it's up to you.
On the Macintosh, the best place will probably be /Applications/RemoteMaster.
On Linux machines, the best place may vary a bit depending on which distro you prefer, but /usr/share/bin or /usr/local/bin are probably good choices. If you're going to be the only one using it, you can even leave it in your /home/(username)/bin folder.
The procedure for preparing RMIR for use also varies by operating system.
On Windows, double-click the Setup.vbs file. This will install the necessary Start Menu items and Registry keys needed to run Remote Master like any other application; once this is done, you may then launch Remote Master the usual way, by going to Start->Remote Master->RMIR. Setup.vbs will also create a shortcut in your "RM" folder called "RMIR". If you'd also like an icon on your desktop, right-click the RMIR shortcut and select Send To > Desktop (create shortcut).
On the Mac, no preparation is needed--simply double-click the RemoteMaster.jar file, like any other application. (Lion users note: RemoteMaster.jar will not appear in Launchpad--you will need to launch RemoteMaster the old-fashioned way, in a standard Finder window.)
On Linux, the procedure is not quite as polished. The supplied rmaster.sh and rmir.sh shell scripts are normally used to launch RemoteMaster from an xterm session; you will probably need to edit these for your particular installation. You may also need to run RemoteMaster with sudo to access the serial, parallel or USB ports, depending on your security settings.
The first time you use RMIR, a pop-up may appear declaring 'No RDF files were found!'. Not to worry, just press the OK button, and RMIR will display a file dialog for you to specify where you've placed the RDFs. It defaults to the rdf subdirectory in the directory you installed RMIR. Just navigate to the folder in which you've placed the RDFs and press the Open button. One this is done, you will receive a similar pop-up regarding the 'Maps' files. Simply repeat the procedure for the Maps directory. The location of your RDF and Map files can always be changed by selecting FILE on the Menu and Set Directory from the Drop-Down menu.
I am going to show some screen shots of the RMIR program.
You'll notice that the RMIR program is divided into several tabs. The actual tabs displayed will vary by remote, for example, if your remote doesn't have learning, the learning tab may not be displayed.
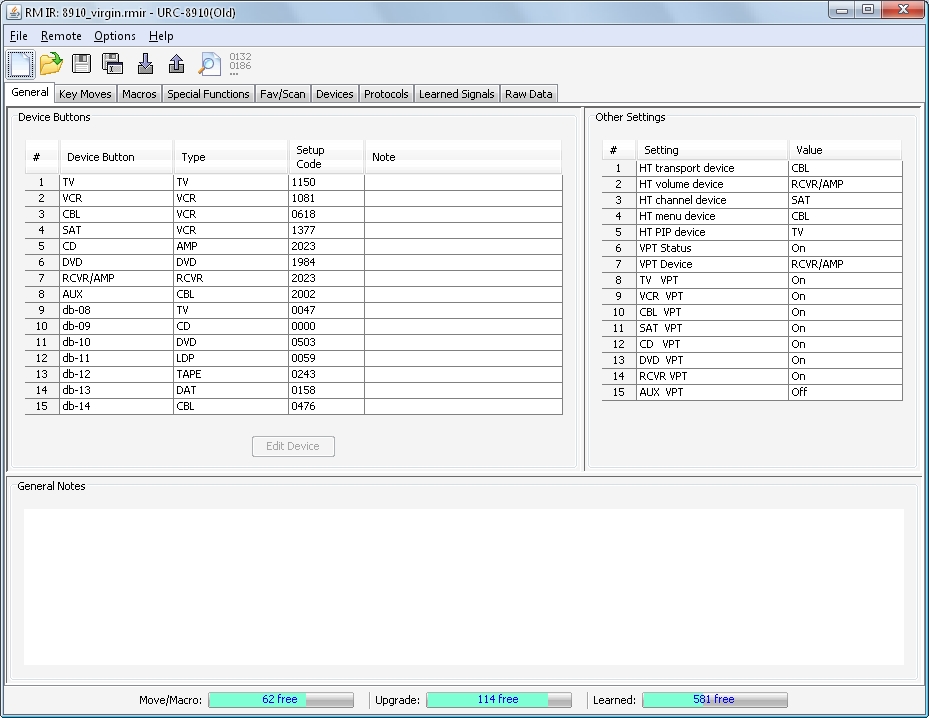
First things first, start up the RMIR program and, with your remote connected to the JP1 cable, click on the ‘Download From Remote' button. You should similar to the one below below.
I am now going to briefly describe some of the basic tabs that you will use, but I will skip a couple that we will cover later.
General Tab
With the General Tab selected, you can see what setup codes you have assigned to each of the device buttons on your remote (eg, on this remote, the TV/1150 code is assigned to the TV button). You can also see how any of the other settings have been programmed (eg, on this remote, Volume Punch Thru is turned on and is set to the RCVR/AMP device)
Keymoves Tab
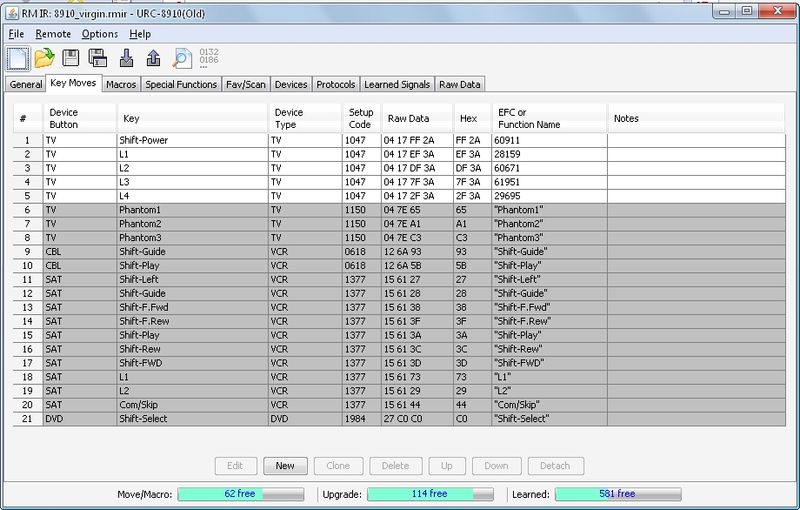
"Key Moves" are buttons programmed using the Key Mover function, which can either mean the button was copied from another button, or it was programmed using an advanced code. This tab shows you all the keymoves programmed in this remote. You can also edit, add or delete keymoves from this tab. You may notice that some of the keymoves are grayed out. This indicates that this keymove comes from a device upgrade - which will be discussed later on. Not all remote models have keymove capability, in which case the keymove tab will not be visible.
Macros Tab
As the name implies, this tab shows you all the macros you have programmed. A "macro" is a sequence of buttons programmed to a single button.
Learned Signals tab
This tab shows you all the buttons that you have programmed using the remote's learning function. In addition to showing you which buttons hold learned signals, it also shows you what those learned signals look like, but more on that later.
How Do You Add an Upgrade
If you have a device that is not supported by your remote, or want to customize and existing device, take a look in the Device Upgrades folder and see if there's one ready-made that you can use. Remember, you don't typically need to find an exact match on the model number of the device as most major brand manufacturers use the same IR signals for all similar devices (ie, for all TVs, etc).
NOTE: you can't edit setup codes that are built into your remote, you can only edit ones that you have added yourself. So, for example, if you are using a built in setup code for your device but you want to improve it, you will need to add a new upgrade and improve that.
Finding and Loading an Upgrade
If you find an upgrade it will usually be a .rmdu file, which means it was created by the RM program. However, there are also some .txt files out there, these files were created by an old app called KM (Keymap Master) but they can be opened and edited using RMIR and RM.
Next navigate to the 'Devices' tab we originally skipped over in the RMIR overview:
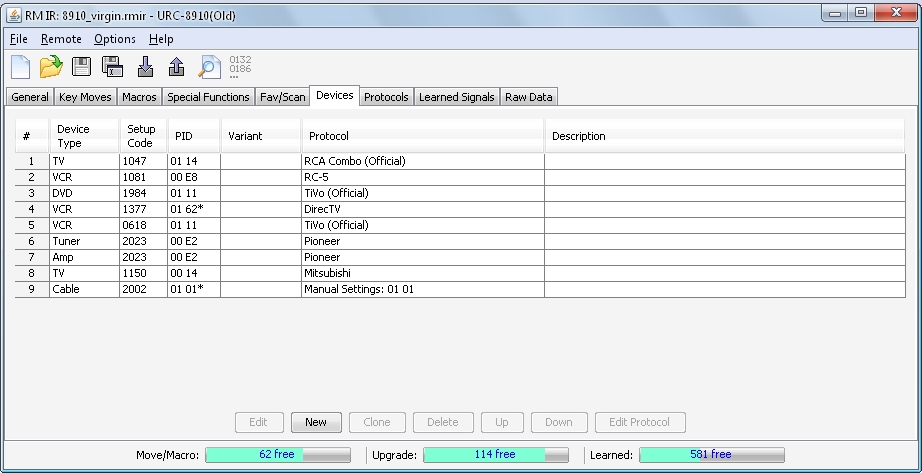
This tab shows the details of the existing upgrades loaded into your remote. To add a new device, click on the 'New' button on this tab.
The upgrade editor window will now pop up:
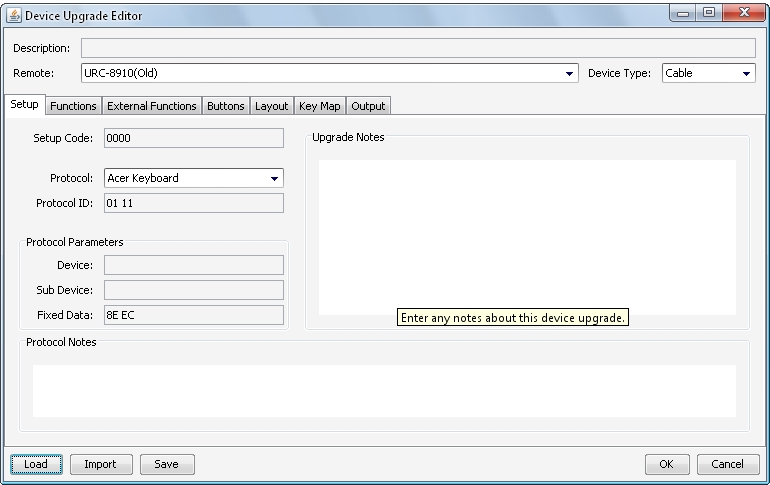
On this screen, click on the 'Load' button and select the file from the upgrade you downloaded.
Loading the file will automatically populate all the required fields in RM. Sometimes, if you're loading an older upgrade file, you will be asked to select a remote. When this happens, the program will tell you the name of the remote that was used to create the upgrade and will offer you a choice of similar remotes. Please chose the closest match. It doesn't matter that you are probably programming a different remote, this is just to tell the program which remote was originally selected.
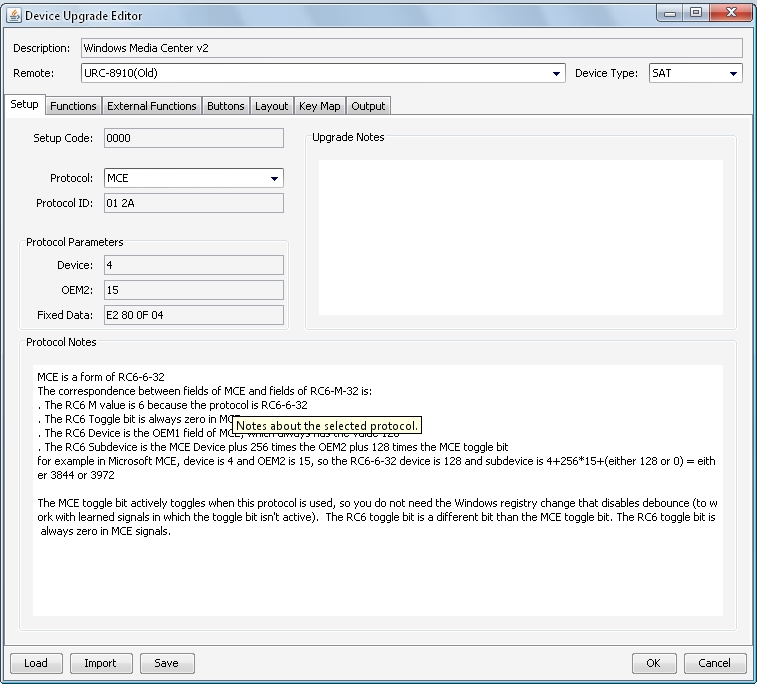
For this example we are going to load one of the files for Windows Media Center. The image below shows what RM looks like with an upgrade loaded.
Understanding and editing the "Functions" tab
The next screen in the RMIR upgrade editor that is of interest to you is the "Functions" tab, shown in below:
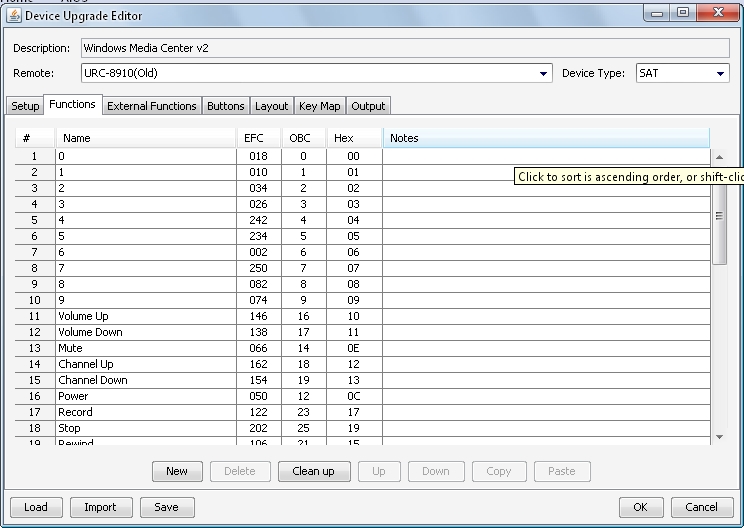
Assuming that the person who created the Upgrade did it correctly - this should contain all of the functions from the OEM remote, and perhaps a few more such as discrete input selects/power etc. If you have additional function codes that you have obtained from elsewhere, you can add them by selecting the New button at the bottom of the screen then scroll up/down to find the newly created Function # spot (will be blank). Place your cursor on the blank Name field and enter a name for your new function. Next, enter either an EFC or OBC code. Make sure that when you enter the additional codes you put them in the correct column, either "OBC" (which stands for "Original Button Code") or "EFC" (which stands for "Extended Function Code", which are also known as "advanced codes"). Once you enter your EFC or OBC, the other fields for your new Function should populate themselves automatically. If you wish you can also add Notes to this new function.
Assigning Functions with the "Buttons" tab
The next screen of interest is the "Buttons" panel, as shown in the image below.
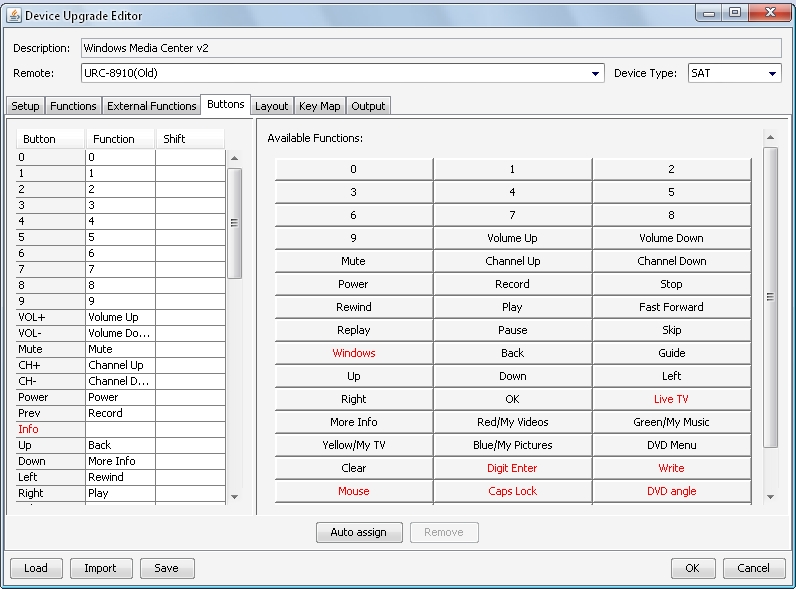
On this panel, you can check that the functions are assigned to the buttons of your choice. Remember, just because it made sense for the buttons to be assigned the way they are for the remote the person who created the upgrade had, doesn't mean it will make sense for your remote. You can assign functions to buttons in 4 different ways:
- Press the Auto assign button to get some functions automatically assigned. The ones that get assigned automatically are the ones where you used the default function names and there's an equivalent button on your JP1 remote for that function. You are under no obligation to accept these default assignments.
- Drag-n-drop a function from the list of Available Functions on the right into the Function Column beside the Button you wish to assign it to
- Click in the Function field next to the Button you want to assign your function too, then double-click the desired function in the Available Functions field.
Use the - Remove - function to clear the function assigned to a button.
Note: if a button is grayed out, it either doesn't exist on your remote, or it's not possible to program it.
Assigning Functions with the "Layout" tab
RM provides another way to check the assignment of functions to buttons, the Layout tab, shown below:

On this tab, buttons with assigned functions are colored in yellow, and buttons that are present in the key map for the selected device type are outlined in orange. Also, functions can be assigned to buttons in 4 different ways:
- Press the Auto assign button to get some functions automatically assigned. The ones that get assigned automatically are the ones where you used the default function names and there's an equivilent button on your JP1 remote for that function. You are under no obligation to accept these default assignments.
- Drag-n-drop a function onto the desired button
- Right-click on a button and select the desired function
- Click on a button, then double-click the desired function.
Assigning the Upgrade
Once you are done assign the buttons as you like, click 'Ok'. A Pop-Up window will show that you are attempting to create a Device Upgrade that is not assigned to a device button yet on your remote, and will ask you if you want to assign it now. You can choose the device button you would like to assign this upgrade to from the drop down window, or just press Cancel. You will now return back to the RMIR Main window with the Devices Tab selected showing your new device added.
At this point, you may wish to change the 'Setup code' for the update you added on the 'Devices' tab, and of course don't forget to assign the new setup code that you created to an actual device button on the 'General' tab if you haven't done so yet.
On the RMIR Command Bar select 'Remote'. Scroll down the drop down box and click on 'Upload to Remote'. The LED on your remote will flash twice when the upload is complete. If your cable is equipped with LEDs, you will see the lights on your cable flash for a few seconds while the image is being uploaded. When they stop, your remote should have the new upgrade installed and functional.
Adding an Upgrade - Summary
- Download the upgrade file from the Upgrade section.
- Load it into RMIR by going to the Devices tab, selecting 'New' and then clicking 'Load' from the Setup tab
- Enter any addition functions that you have codes for in the Functions panel.
- Re-arrange the buttons as you see fit in the Buttons or Layout panels.
- Assign the new setup code to a device button in IR and re-load into your remote.
How Do You Create An Upgrade From Scratch
If you have an unsupported device, and you you can't find an upgrade file for it in the file section, your next step is to create one yourself. If you have a JP1 remote with learning, this is easy to do. If you don't have a learning remote, all is not lost. we'll discuss what you can do in that situation a little later.
Learning OEM Remote Functions
To create an upgrade yourself, here's what you do. First, download your remote's current memory and save it. You can always use this file to restore the remote to its current condition later, if needed. Next, delete any learned signals that are already in the remote. The easiest way to do this is to go to the "Learned Signals" tab in RMIR and click the "Delete All" button. Then, do an upload to your remote.
Next, you'll need to learn as many buttons from your original remote as you can. Some JP1 learning remotes have limited learning memory, so it may take a couple of passes to capture all the buttons from the original remote. I recommend that you start off learning all the buttons that have equivalent buttons on the JP1 learning remote (eg, the numeric buttons, volume and channel buttons, etc). When you reach the memory limit, download the memory and save the file. Then delete all the learned signals like you did before and continue learning. As soon as you reach the memory limit again, or you run out of buttons to learn, download and save the file. When you start learning the more unusual buttons from your original remote (eg, ANGLE, ZOOM, etc) be sure to make a note of which button you learned them to on your JP1 remote.
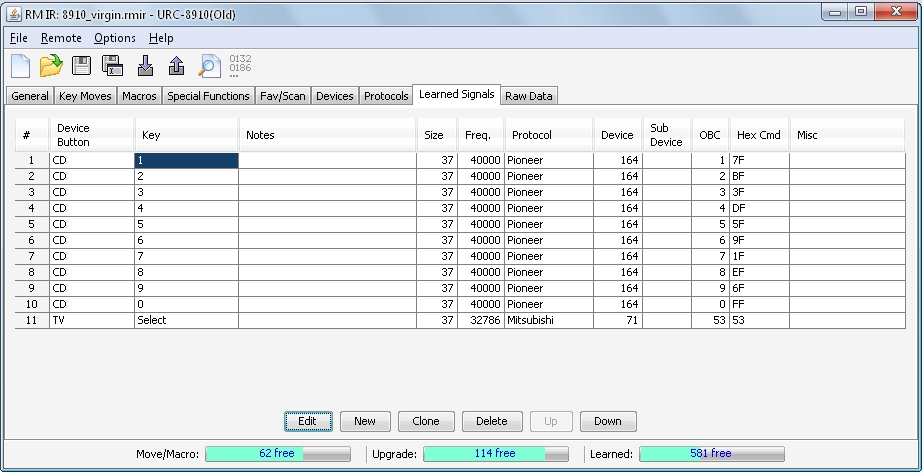
Once all the buttons are learned, you can start the process of decoding them. To do this, go to the "Learned Signals" tab in RMIR. You will see all your learned buttons listed in the column on the left. When you click on one of these entries, the protocol info will be displayed on the right, as shown in the image below:

Here you can see that for the '1' button in CD mode RMIR was successfully able to decode the signal and has displayed the protocol info. This signal uses the Pioneer protocol, with a device code of 164. Chances are, all of the buttons for this device with use the same protocol and device codes, what will change for each button are the OBC and EFC codes.
Starting a New Upgrade and the Setup Tab
There are 2 ways to create a new device upgrade from your learned signals - manually or automatically. If the protocol, device code and sub-device code are the same for all the learned signals, then an automatic upgrade is likely possible. Click 'Convert to Device Upgrade', and a new device with all your selected learned signals will be created automatically, and you can skip to the next section. (If this option is not available, go to Options - Advanced and check Learn to Upgrade Conversion). To start creating an upgrade manually for this device, you should go to the 'Devices' tab and click 'New' to start a new upgrade. Then in the Setup tab, you should make the entries described in the following table.
- Description: Enter a brief description of the device being programmed. In this case we'll enter "Samsung VCR"
- Remote: Select the remote you are programming (should automatically be correct).
- Device Type: Select the type that most closely matches the device you are programming. In this case we'll select VCR.
- Setup Code: As we already know that this VCR responds to the VCR/0240 code, the standard convention for upgrades is to add 1000 to that, giving us VCR/1240. If there's no official code that works your device (as far as your know), use 2000 or greater for this entry. (The max value is 2047)
- Protocol: Select the protocol displayed in IR. In this case we'll select NECx2. If you're unsure which protocol to use, consult the readme file that's in the KM zip file.
- Device Number/Sub-Device: Enter the values displayed in the Learned Device tab Device/Sub-Device columns, in this case we'll enter 164 for Device and there is no Sub-Device. The displayed labels for these boxes varies based on the selected protocol.
- Upgrade Notes: This is the data block to the right of the screen. You can use this space to enter any notes about this upgrade that might be useful to you or to someone else who later uses this upgrade.
The image below shows the Setup panel after all the correct entries have been made:
Assigning the Learned buttons from your OEM remote on the Functions tab
Now you need to go to the Functions tab and enter the data for all the buttons that you learned.
When you first go to the Functions tab, you will see a lot of function names already entered. These entries are just defaults designed to save you some typing, you are under no obligation to use them. You can delete them all if you like.
The process to get the data from the 'Learned Signals' tab into the 'Functions' tab is a bit cumbersome as of this writing. This is on the list of things to improve. Here is the process:
- Hit 'Ok' and go back to the 'Learned Signal' tab in the main RMIR window
- Highlight all of the entries in the 'Key' column and then Right-Click->Copy
- Go back to the Devices tab, and click 'Edit' on your new Upgrade
- Go to the Functional tab and Right-click->Paste in the 'Name' column
- Hit 'Ok' and go back to the 'Learned Signal' tab in the main RMIR window
- Highlight all of the entries in the 'Hex Cmd' column and then Right-Click->Copy
- Go back to the Devices tab, and click 'Edit' on your new Upgrade
- Go to the Functional tab and Right-click->Paste in the 'Hex' column
Right now, all of the entries under 'Name' will be the buttons you 'learned' to on your JP1 remote. At this point you should change them to match the remote you learned from.
Once you are done, you should have something like this:
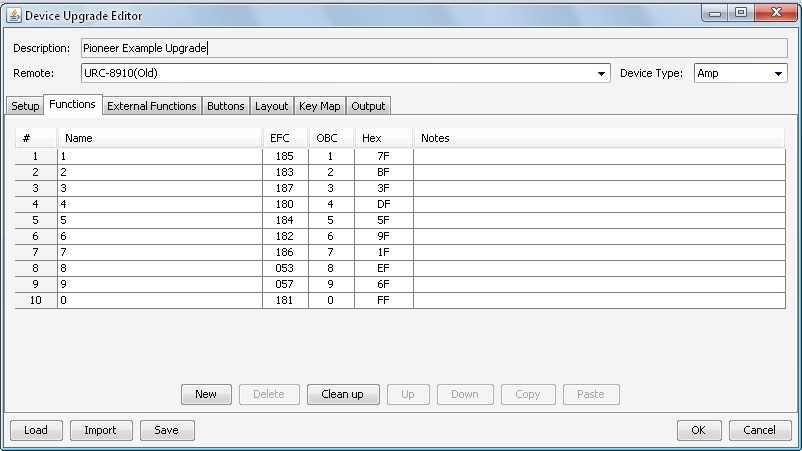
It's a good idea to understand some terminology at this point. The word "Functions" refers to the buttons that you learned from your original remote, you can use the exact names as printed on your original remote, or you can expand it a little to make it easier to understand. For example, you might have a button labeled "CHP/TME" but it might be a good idea to enter it as "Chapter/Time". Alternatively, you could enter it as "CHP/TME" then make an entry in the Notes column to describe what it does. When RMIR refers to "Buttons", it's referring to the buttons on your JP1 remote, not your original remote.
Please enter the data for all the buttons on your original remote, even if you have no intention of programming them to physical buttons - this will make your work useful to other members of the community.
Once you have entered all the info for your learned buttons, your next step is to assign those functions to the buttons on your remote. You can do this on the Buttons or Layout tabs. Follow one of these links to finish out the Upgrade.
If you don't have a learning remote
There are sometimes other ways to get the required data. If you have found a setup code that works some of the functions, post a message in the forums following these instructions
If you have a few codes (like discrete commands) that you would like to add to an existing upgrade, just want to move around some keys, or if you want to check if a newer JP1 remote has the codes you need, you can use the Lookup Tool to find codes.
Another good source for this data in the Pronto file section at Remote Central. If you can find a file there for your device (remember, you don't necessary need to find an exact match for the model number of your device), you can download the file and run the DecodeCCF program against it or import into IR Scrutinizer. These programs will create a text file, that you can open with a spreadsheet program such as Excel, that lists the protocol and other codes for all the learned signals contained within the CCF file.
Finally, you can possibly buy a cheap learning JP1 remote just for creating upgrades, or buy the wonderful IR Widget from Tommy's store.
Creating an Upgrade - Summary
- Learn the buttons from your original remote and download using RMIR.
- Go to the RMIR Devices tab and click 'New' or use "Create Device Upgrade" if all learns are the same protocol and skip to step 5
- Pick a device type, select the correct protocol and enter the correct device codes.
- Copy/Paste functions from the 'Learned' tab to the 'Functions' tab, clean up the names
- Go to the Buttons or Layout panels and assign the buttons as you see fit.
- Assign a setup code and assign the new setup code to a device button in RMIR and re-load into your remote.
Remote Specific Features
Xsight/Nevo
If you have an Xsight or Nevo remote, Remote Master has several enhancements to support its additional features. For more information about these remotes, see Getting started with Xsight and Nevo.
Macros
On the Macros tab, you can create macros that send a series of commands with a single button press. Each step in a macro also has a configurable delay between steps and/or a configurable hold duration. Macro button assignments also appear in the Device editor.
Favorites
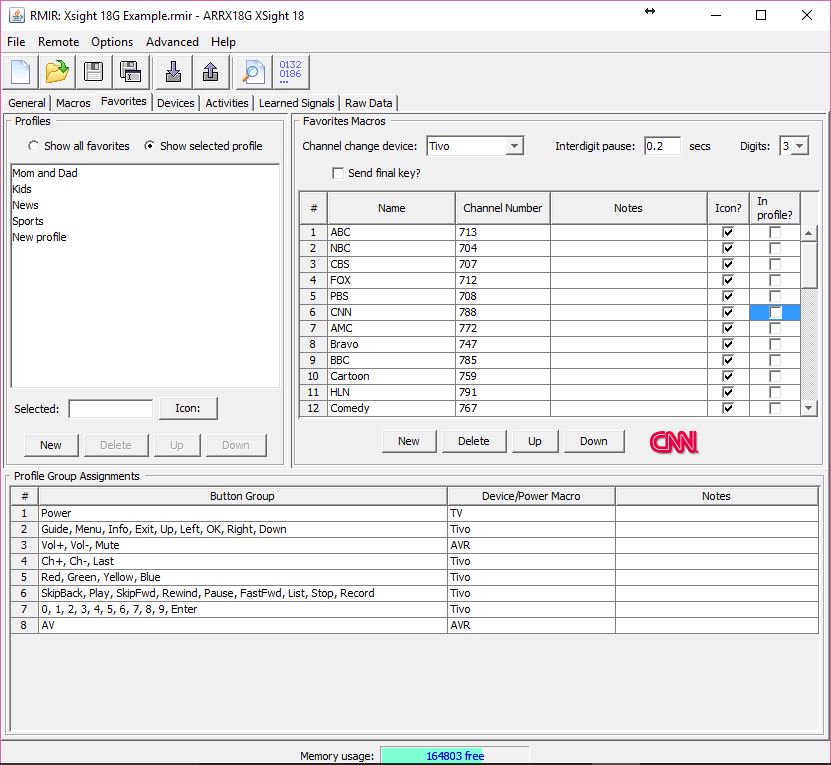
On the Favorites tab, you can enter up to 72 favorite channels by specifying a name, channel number and icon (optional). Double click the icon box to browse to an icon. Each channel can also be included in any of several profiles, by creating or selecting a profile and checking 'In Profile'. In the group assignments area, specify which key groups are assigned to which devices while in Favorites mode.1 All favorites must use the same channel change device.
Activities
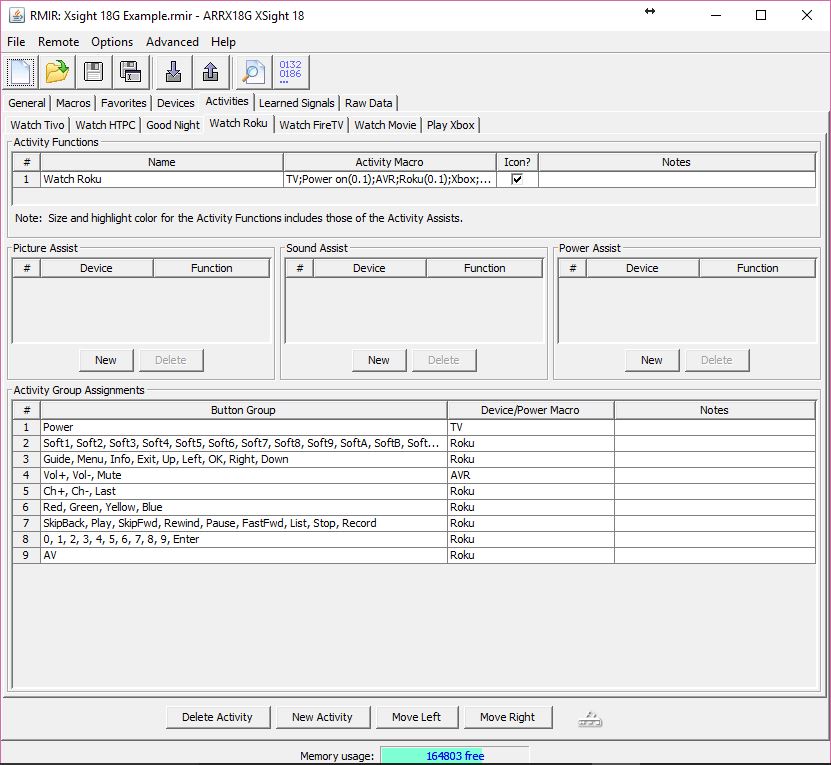
On the Activities tab, you can create special macros called "activities" that send a series of commands (activity macro) to power on and off devices and select the appropriate inputs. Like other macros, each step also has a configurable delay or hold duration. Typical activities you may want to create might include 'Watch TV', 'Watch Movie' or 'Listen to Music'. You can also assign an icon to each activity.1
In the group assignments area, specify which key groups are assigned to which devices when the activity is selected. This is where volume punch through, channel lock as well as all other key group assignments are configured. The Power button has another enhancement in that it can be assigned to a single device command or to a macro consisting of several steps. To assign a macro to the Power button in an activity, first create a macro on the Macros tab, then pick the macro from the drop-down list for the Power button on the Activities tab.
Optionally, you can select functions to include in 'Assist' screens for re-sending power and input commands if the activity fails. This would typically include one or more of the power and input commands used in the activity. If your activity macros often fail due to poor aim or toggle states getting out of sync, consider using Assist. If your activity macros are reliable and utilize discrete power and input commands, Assist is probably unnecessary since you could just as easily run the activity again on the rare occasion that it fails.
There are 3 types of assists - Picture, Sound and Power. You can add one command for the user to re-send if there is no picture, one command for no sound and one or more commands, in sequence, for power on/off. If any commands are configured in this area, an 'Assist' button is shown at the top of the remote screen after the associated activity runs. When the user presses Assist, a new screen with 3 buttons appears - No Picture, No Sound and Power On/Off. Ones with no commands assigned are greyed out. If No Picture is pressed, the command assigned to Picture Assist is sent. If No Sound is pressed, the command assigned to Sound Assist is sent.
Power Assist can have one or more commands. When pressed, a screen with instructions is presented, then the user presses next to go to the next screen which has a button for each device in the power assist list. Even if a device is listed more than once in RM, it only has one button on the remote screen and those multiple commands are executed in sequence, one at a time, when the device button on the screen is pressed, just like a multi-macro or favorites button on a traditional JP1 remote.
Advanced (firmware and system files)
- Firmware Upgrade: The need for a firmware upgrade is checked on every download from a Xsight/Nevo. If an upgrade is needed, a pop-up offers the choice to continue without upgrading (the default) or to perform the upgrade. If you continue without upgrading, a further pop-up tells you that you can stop being offered the upgrade in future by checking the item "No XSight Firmware Upgrade" on the Options menu. This is a persistent option that keeps its setting when RMIR is closed and reopened. If you choose to upgrade, a progress bar gives you a running commentary on the various stages as they occur.
- Xsight operations: All other XSight facilities are on the "XSight operations" submenu of the Advanced menu. This submenu is only visible when RMIR has an XSight setup loaded, either by downloading a remote or loading an appropriate .rmir file. If you have the current firmware, you can force RMIR to behave exactly as if upgrading from an older version by checking "Force XSight Firmware Upgrade" on the submenu.
- Verify XSight system files: Checks the system files to see if all are present and if the file data is not corrupt. A pop-up at the end gives the result of the check. Option is only available if firmware is current.
- Upload XSight system file...: Opens a list of all system files and allows you to upload one of your choice. After upload, it remains open to allow you to upload further files. Exit with the Close button. This feature is intended to allow you to replace any files found missing or corrupt by the Verify process.
- Format and rebuild XSight file system...: Formatting deletes all files, both system and user ones. The rebuild step copies back valid versions of all system files. The remote is left in a factory reset state. However, if you do a download before this operation, then when the rebuild completes, you can immediately do an upload to restore the downloaded setup. As this is a major operation, you get a confirm request before it proceeds.
Other Features
- Icons: On the General tab, Activities tab and on the Functions tab of the device editor, double click the Icon box to select an icon for the device, activity or function. (Channels and functions may have any icon from any image file you choose. But Devices, Activities and Profiles are limited to the set of built-in icons).1
- Soft buttons: On the Layout tab of the device editor, drag and drop functions onto the remote screen to add functions to the display. Use the Page+ / Page- buttons to navigate to different screens (up to 5 pages of 6 functions per page2 ). You can also use the Buttons tab to assign functions to the Soft buttons.
- Pause: Each step in a macro can have a delay of 0.1-10.0 seconds before the next step is executed.
- Hold: Each step in a macro can continuously send (hold) the signal for a specific duration (useful for things like big volume changes or power commands that must be held for a long duration).
- Volume Lock: Because of Xsight/Nevo activities feature, volume lock works a little differently than it does on other JP1 remotes. On the General tab, select which master device is used for volume control and turn on/off the devices whose volume buttons are locked to the master device. This controls how volume works when operating each device outside of an activity. For volume lock within an activity, each activity has a volume control device selection in the group pane. The device chosen in an activity takes precedence over the volume lock setting on the General tab.
- Channel Lock: Assign the channel control device in the group pane of each activity.
Notes:
- Icons and Favorites profiles are not available on the Xsight Lite, Plus, or Monster Revolution 200. Total number of icons across all favorites, profiles and functions is 80 minus the 8 built in profile icons.
- Xsight Lite, Plus and Monster Revolution have 3 soft buttons per page.
Other RMIR Resources
Videos
The YouTube channel The Grok Shop has a helpful series of videos showing how to use RMIR to configure a JP1 remote, and how to install an extender.
