Special Protocols
|
Back to IR Help Index |
Previous Topic Extenders |
Next Topic: Finding Codes |
Overview
There are some special protocols that have been written to add even more flexibility to your JP1 remotes. Special protocols are really keymoves. Your extender might describe in detail how to construct the hex for these keymoves, because we used to have to do these in an outside program and then copy the hex in as a keymove. IR now has the ability to aid you in using many of these special protocols.
The special functions that IR supports in the “Special Protocol” tab include
Custom Mode Name
DSM - Device Specific Macros
DKP - Double Key Press
LKP - Long Key Press
Multiplex
Pause
TOADTog - Toggle Only Activated Device Toggler
Since a special protocol is really a keymove, a device upgrade and protocol upgrade are required to be able to set them up. A [SpecialProtocols] section in the RDF lists all the special protocols available for the remote. The special protocol upgrade and its associated device must be loaded into IR or your options will be grayed out.
After pressing the [ Add ] button on the Special Protocol tab, this Special Protocol screen pops up.
In the bound key section, you select the device and the key that you want to hold the special function. The key can be a plain key, a shifted key or if the extender allows it, an xshift key. From the keyboard you would access the shifted key by pressing [Setup] and then the key, and you would access the xshifted key by pressing [Setup],[Setup] and then the key. Shifted keys and xShifted keys change the upper two bits of the base keys keycode. When using these shifted or xshifted keys inside macros, device specific macros , double keypresses and long keypress and TOADTog protocols, we don't need to use the [Setup] key, we just set the bits with Add Shift, and Add XShift. This saves space and is more reliable than using the [Setup] key prior to the key.
The Type list provides you with the special protocol choices. The list of possible choices is defined in the RDF. If the options are grayed out, you don’t have the device/protocol combination installed. Some Special protocols require an extender and some don’t. The Pause protocol is available with or without an extender. You can get the protocol for the Pause from either RemoteMaster or KeyMap-Master. There may be a stand-alone multiplexor as well.
DSM - Device Specific Macros
You’ll remember that a macro is global or modeless. A macro key effects all device modes. A DSM is only in effect when the bound device keys are active. A device specific macro is built much the same way as a macro key.
A DSM can be up to 12 button presses in length. Here is an example. When I pressed the DVD Stop button, shift-Stop and xShift-Stop are processed.
First, select the key that you want the macro key to be bound to.
Then build your macro from the list of available keys, by highlighting the key in the left column and pressing [Add], [Add Shift]; [Insert] or [Ins Shift].
If you are using a shifted key inside a macro, you use the [Add Shift]/ or [Ins Shift], instead of inserting two key presses. This saves key memory, and to give you more reliable results.
Similarly if you are using an xshifted key inside a macro, use the [Add Xshift] or [Ins Xshift] to save memory and give you more reliable results.
In the example above the Shift-Stop and XShift-Stop were added to the macro using [Add Shift] and [Add Xshift]. This would be the same as saying [setup][stop][setup][setup][stop] but uses 3 fewer bytes and is more likely to run correctly.
DKP - Double Key Press
The double key press lets you process different keys depending on whether the button was pressed once or twice during the specified time period. You can adjust the duration from 1 to 15. A 15 allows a longer time between presses. You may have to play with the duration to get it just right for your heavy handed users.
Here is a double key press that has been placed on my DVD Pause button. A single press would send out Shift-Pause, a double key press would send out xShift-Pause.
Note: DKP and LKP are part of the same protocol, LDKP – Long/Double Key Press
LKP - Long Key Press
The long key press lets you assign different macros depending on the duration of the key press. You can adjust the duration from 1 to 15. A 15 requires a very long press. You may have to play with the duration to get it just right for your heavy handed users.
Here is a long key press that has been placed on my DVD fast rewind button. The short press executes Shift-F.Rew, the longer key press to xShift-F.Rew.
Figure 4-1
This macro selection is very similar to your regular macro selection. You start by populating your Short Key press macro. Then select the Long Keys area and you are ready to select the go over and select the available keys. Just as with macros, if you want the shifted value, you add the key with [ Add Shift ] or [ Ins Shift ], this requires less key strokes and conserves memory, and with some extenders the shift key followed by the key in a macro may not give you the results you are seeking.
Note: DKP and LKP are part of the same protocol, LDKP – Long/Double Key Press
Multiplex
The multiplex is a way of changing the setup code for a specific device mode.
The multipelxer is most often used when you have more devices than you have device buttons.
Another common use of the multipelxer is to configure the button for the same device differently for different activities.
When you have more equipment than device buttons, you'll usually need a multiplexer unless the remote has phantom devices. Phantom devices are much easier to setup because they have their own device index. MultiPlexed devices share the same device index. This makes setting up keymoves and special protocols for the device index tricky. While the setup code is changing, the keymoves remain static. A lot of planning needs to be done if you want to use multiplexing on equipment that requires keymoves.
In the example below, when you press Shift-1, the setup code for the bound device key index(DVD), will be changed to VCR/DVD 0162.
Figure 4-2
Before IR took over this special protocol we’d have to setup keymoves to do this in hex.
Summary. Instead of having to press the device key, hold the [Setup] key until the red light blinks twice, and enter the 4 digit manufacturer’s code, the device mode’s setup code can be changed by simply pressing Shift-1. This also handles device type assignment, so no need to go through the whole *992 scenario.
Pause
Sometimes your equipment can’t respond as fast as a macro sends signals, especially if the equipment is just powering up. The solution is to add some type of delay. If functions work when manually sent in sequence, but don’t work when automatically sent in sequence, and you determine it is not a duration problem, then it’s time to try delays.
Most often a device just needs time do the operation you gave it before it is ready for the next
1. One alternative method of causing a delay is avoiding sending two consecutive commands to the same piece of equipment, by altering your macro to send a command to another piece of equipment between the two commands you may get enough delay without having to add a special protocol.
2. If you don't feel up to working with special protocols you could try the Zenith Trick.
3. The third method requires that you install the Pause special protocol. If you are hesitant to jump into extenders just yet, you can get the Pause protocol from KM or RM. The advantage over the Zenith trick is that it allows fairly precise control over the delay. Its main disadvantage is that it will require upgrade memory and an extra keymove.
You can then set up your delay from the Special Protocol screen.
You specify the length of the delay.
Figure 4-3
The Zenith Trick
Basically, for this you would program a keymove from the VCR/0039 setup code onto the TV's "RECORD" button (it doesn't matter what EFC you use), then include the TV's "RECORD" button in the macro where you need the delay. This will give you 2 or 3 seconds delay.
Checking for Duration
This is for extended remotes. The duration is set to a minimum.
1) Put the problem function on a pressable key, and press and hold the key. If the key doesn’t work you’re problem goes deeper than duration.
2 ) Create a 2 key macro where your problem function is the first key in the sequence. If this fails you have a duration problem.
ToadTog - Toggle Only Actuated Device Toggler
TOAD stands for "Toggle-Only Actuated Devices", which basically means these devices do not have discrete power and/or input codes. The TOADTog protocol is a workaround for this.
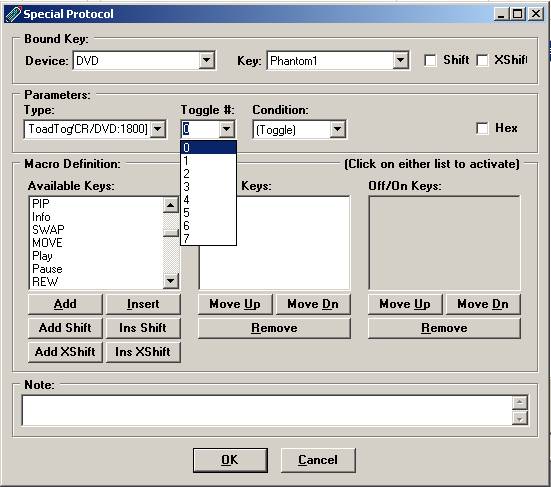
The ToadTog Protocol manages 8 state bits and selectively runs commands based on state.
Figure 4-4
ToadTog lets you construct toggle functions from discrete functions, and/or construct discrete functions from toggle functions, and/or track the state of device toggles so that other functions may be sent differently depending on that state.
To use ToadTog, you define KeyMoves for VCR/1800 with hex commands that are 1 to 13 bytes long.
Using the ToadTog Protocol takes some planning. You have 8 state bits, that can be either ON or OFF. I’d suggest that you record this information in your notes on the remote.
ToadTogs are frequently used in Home Theater type macros, where you want to keep track of the status your equipment
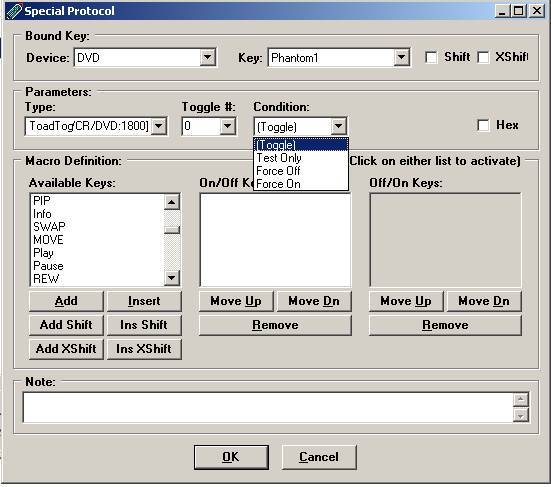
A ToadTog button can toggle the bit, test the bit, force it on, or force it off.
Figure 4-5
Here is a simple toad tog example:
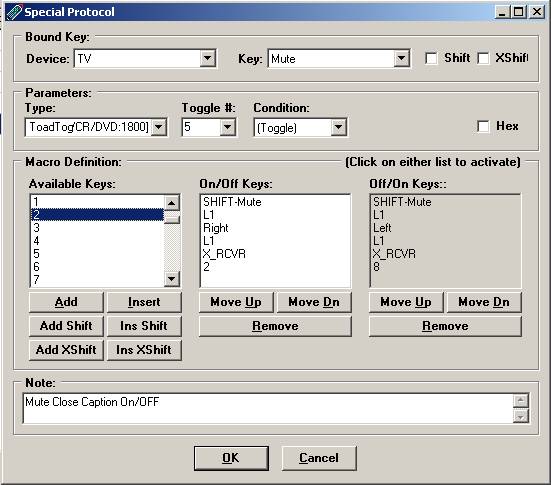
Different functions are performed depending on if bit 5 is set or not. The bit changes state before executing the keys.
Figure 4-6
Creating the hex to do this used to be difficult and tedious.
Fortunately IR now does that translation for us!
Discrete Codes
What are discrete codes?
When you push your power button, your TV will turn on if its off, or off when its on. This is a kind of toggle button. The remote sends one code your TV will react depending on the state its in. A "discrete on" code would be a signal that ONLY turns the device on. If the equipment is already on, it remains on. These are most often used to ensure your home theater components stay completely in sync for powering on and off and changing inputs. Such specialized and otherwise hidden codes may also be available for direct access to other "toggled" or "rotating" functions such as television inputs, receiver sound field settings and on-screen display modes.
If these codes are "hidden", how are they found?
The ways for finding codes are discussed in Chapter 5, Finding Codes
Do all brands and models have these hidden codes? No! Entire brands of equipment have been found to have no discrete codes whatsoever. Even if a brand is known to feature some discrete functionality, particular models or lines may not.
Custom Mode Name
Some remotes, like the OFA 8910 and the RS 15-2117 have an LCD screen that displays the current device mode. This special protocol allows you to customize the name of the mode displayed on the LCD screen. If your extender comes bundled with a custom mode name protocol, you’ll have to read the associated ReadMe file to see how your remote works.
This is the custom name screen with the 8910 remote.
Figure 4-7
The 8910 LCD displays up to 9 characters. The first 5 characters are displayed on the top line and the last 4 characters are displayed on the bottom line. See the table below for the character values.
Conversion Table for 8910
Check your readme file to see your Conversion Table
Chart 4-1
This sets up a special keymove on the Shift-Aux key to MISC 1107. MISC 1107 is the dummy device, which calls the special protocol.
When we include the Shift-Aux button in our Aux selection macro, VCR2 0042 will display on the LCD.
|
Back to IR Help Index |
Previous Topic Extenders |
Next Topic: Finding Codes |


