IrScrutinizer Guide
Introduction
IrScrutinizer is a powerful program for capturing, generating, analyzing, importing, and exporting of infrared (IR) signals. For capturing and sending IR signals several different hardware sensors and senders are supported. IR Signals can be imported not only by capturing from one of the supported hardware sensors (among others: IrWidget, Global Caché, and Arduino), but also from a number of different file formats (among others: LIRC, Wave, Pronto Classic and professional, RMDU (partially), and different text based formats; not only from files, but also from the clipboard, from URLs, and from file hierarchies), as well as the Internet IR Databases by Global Caché and by IRDB. Imported signals can be decoded, analyzed, edited, and plotted. A collection of IR signal can thus be assembled and edited, and finally exported in one of the many supported formats. In addition, the program contains the powerful IrpTransmogrifier IR-renderer and -decoder, which means that almost all IR protocols known to the Internet community (over 100) can be generated as well as decoded.
This document is not a manual for IrScrutinizer. (The full manual is found here, which should be read for questions not addressed here). Instead, it is a gentle guide to a program that can possibly look somewhat overwhelming at the first look. It focuses on what tasks can be achieved, and on the general "why", instead of a detailed description of all features.
As a tutorial, this document is not updated as often as the program, or even as the documentation. So the current program may have slightly different features and slightly different look than shown here.
Prerequisites
For the sequel, a basic understanding of IR signals is required. My favorite introduction is the one by San Bergmans. My glossary (also included under the Help menu of the program) may come in handy. In particular, there is a concise description of the semantics of the Prono hex format.
History
In 2011, I wrote an IR signal "engine" implementing the IRP notation, called IrpMaster. It was invoked as a command line program. Later that year, a program called IrMaster was released, which among other things constitutes a user friendly GUI front end to IrpMaster. The first versions of the present program, IrScrutinizer, was also based on IrpMaster, and adds functionality from IrMaster, in particular the possibility to collect IR signals, a vastly improved import and export facility, and edit collections of IR commands. (IrScrutizer almost completely replaces IrMaster, which is no longer maintained.) In 2019, IrpMaster, and the decoding engine DecodeIR, was replaced by IrpTransmogrifier, which is an even more developed rendering and decoding engine.
Copyright
The program is copyright(c) by Bengt Martensson, and is Free Software published under the GPL3 license. My copyright does not extend to the embedded "components", which are published under similar, but compatible licenses. Details are given in the manual.
Concepts
For anyone familiar with the IR signals, the program is believed to be intuitive and easy to use. Almost all user interface elements have tool-help texts. Different panes have their own pop-up help. Many panes have a context menu, bound to the right mouse button.
Next picture shows the program immediately after startup.
In the upper row, there are six pull-down menus, named File, Edit, Actions, Options, Tools, and Help. Their usage is believed to be mainly self explanatory.
Options to the program are in general found in the Options menu, or its subordinate menus. Some parameters for particular export formats are found in the sub-panes of the Export pane. Also the hardware configuring panes contain user parameters.
The main window is composed of seven sub panes denoted by Scrutinize signal (for processing single signal), Scrutinize remote (for collecting several signals to one "remote"), Generate (generates IR signal from protocol name and parameters), Import, Export, Capturing Hardware, and Sending Hardware respectively.
Installation
IrScrutinizer takes great pride of being a portable program, and runs on Windows, Linux (including RaspberryPi), and MacOS. For Windows and MacOS, native installation packages are available; for Windows it is the setup file *.exe, for Mac the zipped app *.MacOS.zip. Users of (most) 64-bit Linux-es can use the AppImage (*x86_64.AppImage) version. In all these cases, they come with its own Java installation, although the Windows version allows for using a previously installed Java. Others, and those who do not like preinstalled binaries, can install the generic binary package, or install from the sources directly. (Files ending with md5, sha1, and sha512 are checksum files, and are not required for installation.)
Details are given in the manual. Downloads of the currently latest released version are found here.
Scrutinizing a single IR signal
The Scrutinize signal pane is used to analyze a single IR signal. Press F9 to see a sample IR signal directly. The program will now look like this:
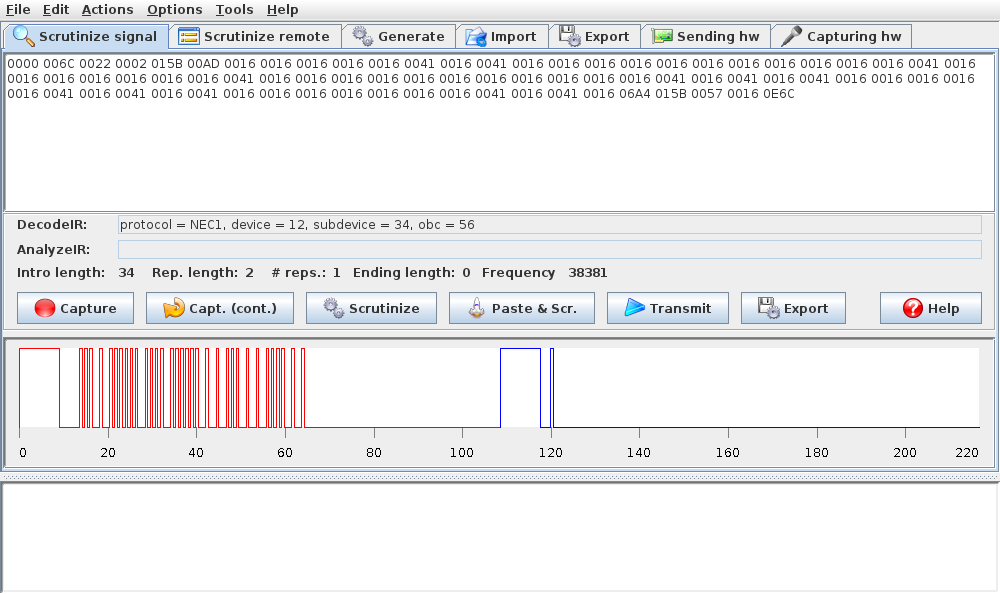
The upper sub-window shows the signal either as Pronto Hex (the default) or as a number of timings in microseconds (selected by Options -> Output text format). Then there follows an output area for the results of the decode and (if selected through Options -> Invoke Analyzer) a computed IRP form, possibly together with some other identified parameters. The plot windows shows the signal, with the modulation removed. The Intro sequence is shown red (if present), the repeat signal blue (if present), while the ending signal (only present in rare cases) is shown green.
Basically, the user enters something in the upper subwindow, or capturing something with hardware. The program will then analyze the signal. Things that can be done on this pane:
- If suitable capturing hardware is connected and opened, pressing Capture will capture one IR signal form the hardware, and scrutinize it.
- Again assuming suitable hardware opened, pressing Capt. (cont) will start a capturing thread, capturing signals over and over again, without saving, until the button is pressed again.
- The user can enter something in the upper window, often by pasting from the clipboard, or hand modifying already present content. This requires pressing the Scrutinize button.
- If suitable sending hardware is connected and opened, pressing the Transmit button will transmit the signal with the selected hardware.
- If a suitable export format is selected, the Export button will export the signal in the export format selected.
Different formats are accepted in the input window: Pronto Hex, Timing list with or without signs, as well as the Global Cache irsend formats are currently understood.
The plotter can be zoomed (of course, only on the horizontal scale) by pressing the left mouse button at the desired start point, and dragging to the desired new ending point. To reset, use "Reset plot" from the context menu or the Actions menu. For comparison with other signals, the plot can be "torn off" by Action -> Clone plot menu entry.
There are a number of other possibilities offered by the top menus, and the context menus in the different sub-windows.
Excercise 1.
Find an "arbitrary" IR signal in the JP1 or RemoteCentral forums, for example this one. Copy the signal to the clipboard, and paste it, and scrutinize it (the button Paste & Scr. makes it in one click).
Excercise 2.
Make sure that Pronto Hex is selected as output text format. (Options -> Output text format). Press F9, which will show a NEC1 signal. Using the keyboard, remove the last four hexadecimal numbers ("015B 0057 0016 0E6C"). Press Scrutinize. This will produce an error message, since the signal length is now inconsistent with the header. So we fix that: Change the forth number from 0002 to 0000. Pressing Scrutinize again shows that the signal now decodes, but instead of "NEC1" as protocol, we now have "NEC". There is strictly speaking no protocol named NEC; this is the decoder's way of saying that it has identified a NEC-type signal, but the repeat part is missing.
Scrutinizing a remote (several IR signals)
Often, we would like to consider a whole set of IR signals, for example, all that can be used for controlling a piece of consumer electronics. The word remote will be used in the sequel to denote such a set of IR signals, having something in common.
IrScrutinizer, as well as most other IR signal programs, can consider an IR signal either as a Protocol and parameteres (parameteric) or as (one, two, or three) sequences of durations, denoting on- and off-periods, a raw signal. Whenever possible, the parametric form should be preferred.
The Scrutinize remote pane, has two sub-panes: Parametric Remote and Raw Remote. This tutorial will only consider the parametric remote sub-pane.
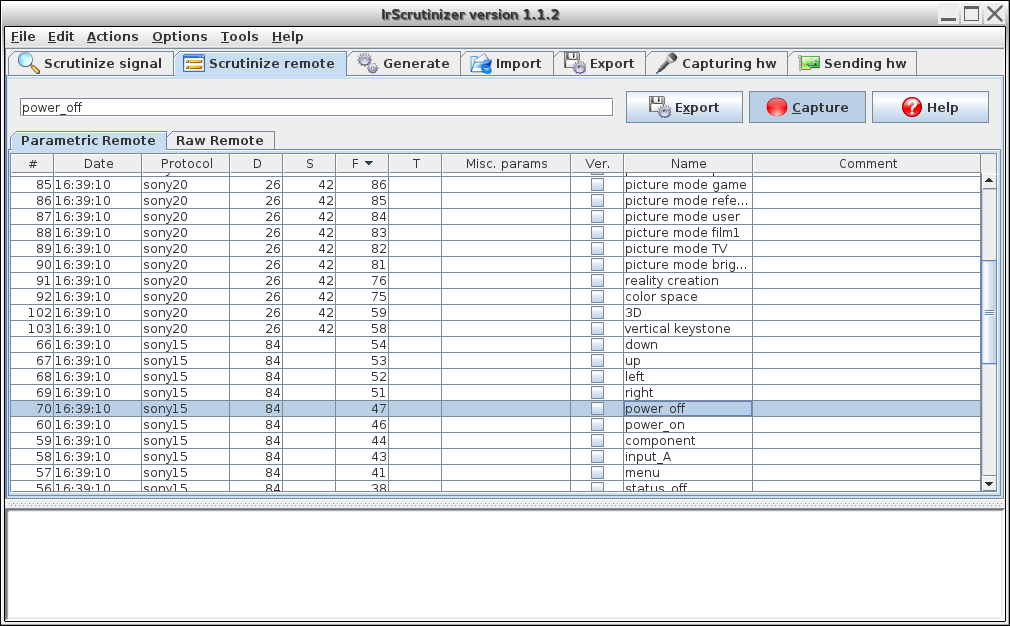
The pane consists of a table, like in a spreadsheet program. There are columns for protocol name, the more common protocol parameters, name, etc. It is used for capturing a number of signals using connected hardware, or to edit/inspect a previously captured, or imported, remote. See picture.
Just like in a program like Excel, the columns can be resized, edited (using the text area on top of the table), and sorted from an arbitrary column (requires enabling the sorter in the context menu). The colums can also be reordered by dragging them with the mouse.
Capturing in Parametric Remote
First of all, setup and test the hardware is to be used. Make sure that the capturing hardware has been opened. To capture parametric signals, the user just presses Capture, which now stays active, until pressed again. IrScrutinizer will now use a separate thread for collecting the captures, entered into the table. The user can intermix captures and entering of names with the keyboard in any order he or she wishes.
The table can be edited the keyboard. New signals can be entered, having any recognized protocol name as protocol (case not being recognized). There are also a number of interesting things that can be done with the context menu.
When finished, the table is exported in a suitable file format. Alternatively, the table can be copied to the clipboard, for being pasted into a spreadsheet program, or the functions tab of RemoteMaster.
Generating IR Signals
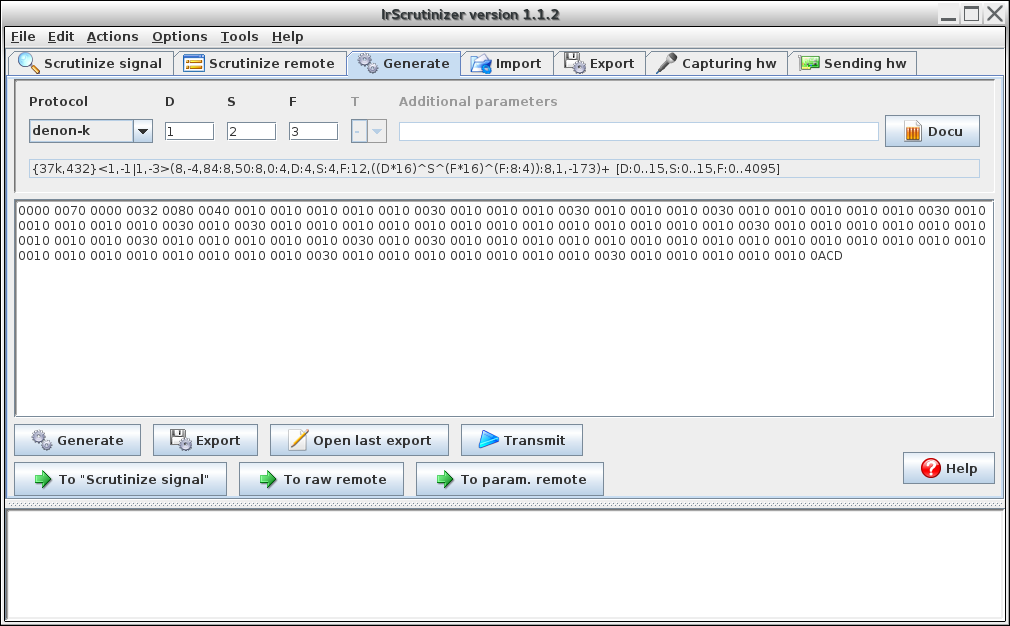
IrScrutinizer can generate well over 100 different IR protocols. For this, select the desired protocol from the combo box. Different protocol require different parameters. The four most common are D ("device"), S ("subdevice"), F ("function"), and T ("toggle"). After having selected protocol, the fields corresponding to parameters not used by the current protocols are disabled. Also, some protocols need other parameters. In this case, these are entered in the Additional parameters text field, using the format like X=0 Y=42. Note that there are no spaces around the equals sign, however, space between the assignments.
The signal is generated by pressing Generate. See the picture.
The thus generated signal can be exported, or transmitted with suitable connected sending hardware. The three buttons in the lower row transfers the signal to the Scrutinize signal pane, or adds it to the Parametric Remote or Raw Remote panes.
Some programs use the word "render" instead of "generate".
It is also possible to extend IrScrutinizer with new protocols. This is done by adding protocols to the protocol data base, the file IrpProtocols.xml, but is well outside of the scope of this introductory guide.
Importing IR Signals
The Internet is a vast resource for IR signals for different devices. Unfortunately, there is no universally accepted exchange format for a "remote", i.e. a collection of IR signals with names. For this reason, IrScrutinizer implements a number of different importers. These serves to fill the table Parametric Remote or Raw Remote, where the imports can be further edited. That table does on clear on subsequent imports, so it can be used to merge signals from different sources. Data bases, local files (even zip-ped), directory hierarchies, and URLs, and even the clipboard can be imported.
In this introductory guide, we do not describe all the different importers. Usage of the not described importers is in general similar to the ones described.
The IRDB Database
IRDB is "one of the largest crowd-sourced, manufacturer-independent databases of infrared remote control codes on the web, and aspiring to become the most comprehensive and most accurate one."
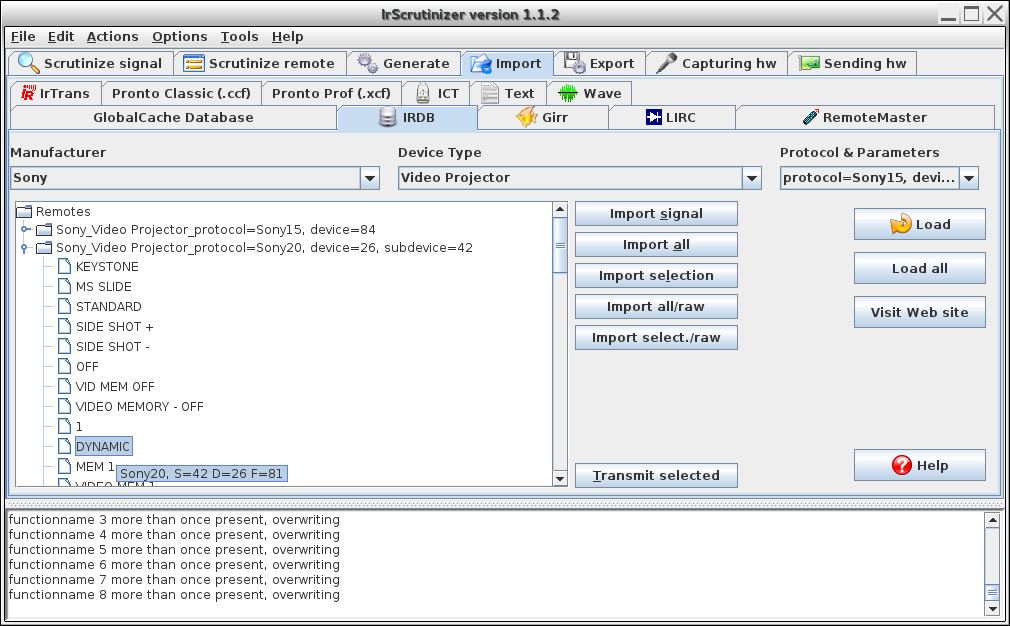
To use, select the IRDB sub-pane within the Import pane. First, select "Select me to load" in the Manufacturer combo box, in order to load the list of known manufacturers. Select the desired one. This loads the list of Device Type's known for that manufacturer. The Protocol & Parameters combo box is now loaded by the known "devices". Select one, and press the Load button. This downloads the information from the data base and pushes it to the tree in the left middle part. Alternatively, the button Load all will load all of of the entries under Protocol & Parameters. The next picture shows IrScrutinizer after having Load all Sony video projectors.
(During import, IrScrutinizer detected some inconsistencies in the imported data, as indicated by the messages in the console.)
The import tree is organized like this: The top level note is always "Remotes". Its immediate children are the remotes in the import, and can be opened or closed by clicking on the symbol to the left of the folder symbol. (The picture shows the first remote closed, and the second remote opened.) The children of the remotes are the named IR signals. By hovering the mouse over one such, its protocol and parameters (if available) are displayed as tooltips. (See the picture, where "DYNAMIC" is selected.)
The signal can now be imported by pressing Import all, which transfers them to the Parametric Remote sub-pane in Scrutinizer remote pane. Alternatively, a subset can be selected with mouse clicks, (Shift-left and Ctrl-left works as espected for selecting multiple signals) and imported by Import selection. The button Import signal transfers the (single) selected signal to the Scrutinizer signal pane. If suitable sending hardware is opened, a selected signal can be transmitted directly by the Transmit selected button.
Importing Lirc files
Both inside and outside of the Lirc community, there is often a need either to analyze or to extract the information in a Lirc configuration file. IrScrutinizer is very well fit for this task, as it contains a great deal of the Lirc code (translated to Java). The Lirc remotes data base is also a considerable resource, to be considered when hunting the Internet for IR codes.
To import a single Lirc file posted in a web page or in a mail, it is easiest to just copy it to the clipboard, got to the Lirc import pane, and click Load from clipbard. To load a local file, use the ...-Button to navigate to the file, and press Load File/URL to perform the actual import. This can also be used import directories containing Lirc configuration files. (In this way, the whole Lirc remote data base can be imported, at least if sufficient memory is available. On my computer, it takes less than one minute.)
Often, the imported Lirc files contain problems of different types. During import, there may be warnings in the console. IrScrutinizer handles these problems gracefully, in general by just ignoring the entries that it could not make sense of.
The entire Lirc data base can be browsed here. (Note that the remotes without "Timing" are usable only with specialized hardware, for example a certain notebook computer, and unusable for the rest of us.)
Assuming Git is installed as a command line program, the entire Lirc remote data base can be checked out to a local disc by a command like
git clone git://git.code.sf.net/p/lirc-remotes/code lirc-remotes
As the name of the text area and button suggests, also URLs, like
http://sourceforge.net/p/lirc-remotes/code/ci/master/tree/remotes/yamaha/RX-V995.lircd.conf?format=raw, can be directly imported by entering it into the File/URL area.
Importing Pronto Classic (ccf) files
In particular on RemoteCentral, there is a huge number of CCF Files for the Philips Pronto Classic. They are not really a data base for IR signals, rather a complete configuration for the probably best remote control there was, around 15 years ago. IrScrutinizer only considers them for importing the contained IR signals.
When downloading files from e.g. RemoteCentral, these are often zipped. There is no need to unzip these; IrScrutinizer will open the zip files directly.
When importing a CCF file, the contained devices (in the Pronto sense) will be mapped to different "remotes" in the import tree. Sub-pages of a device will all be merged together.
Unfortunately, there are often small problems within the imported files, in particular invalid IR signals. These problems are listed to the console. IrScrutinizer handles these problems gracefully, in general by just ignoring the entries that it could not make sense of.
Here is a file to exercise on, it contains several devices, there are sensible IR signals, as well as signals not recognized, likely bad learns.
Importing RemoteMaster files
The JP1 forum is also a vast source of IR signals, see the file section and the lookup tool. Their files are in general "Device upgrades" configuration files for different remotes manufactured by UEI (Universal Electronics), meant to be maintained by the program RemoteMaster. This means that the "protocol" used in a device upgrade can sometimes be hard to understand. The "protocol" in a device upgrade does not quite correspond to the meaning of "protocol" in IrScrutinizer, rather it is a an "executor", either built-in in the UEI remote, or a custom protocol, which is a small machine code chunk contained in the device upgrade, particular to the very microprocessor of the remote. In these cases, either an instance of that processor, or an emulator for it, would be required to faithfully render the signal. Fortunately, this is not always the case, and the contained protocols can be mapped onto the known IR protocols easily. Thus, the RemoteMaster import facility is by necessity limited and incomplete.
Excercise
Here is a file to try, that imports fine. (The "Download" button is only visible for logged-in users.)
Importing Wave files
IrScrutinizer can import IR signal packed in wave files (*.wav). The details are outside of the scope of an introduction. (Leave "Half carrier frequency" selected, unless you know what you are doing.)
Excercise
Try importing this file. Note that some information on the content of the file is written to the console.
Importing "text" files
In the absence of a universally accepted exchange format for remotes (in the sense of sets of named IR signals) -- a gap that the format Girr is trying to fill -- IR signals are often published in different text formats, or as spreadsheets. IrScrutinizer has quite some facilities for importing that sort of files. It can (at least not presently) not open Excel .xsl-files directly. Instead a spreadsheet program like Excel, OpenOffice/Libreoffice or Gnumeric can export (a subset of) its data as comma (or tab) separated values, a text file where the fields are divided by a certain character, in general the comma (,), the semicolon (;), the TAB character (ASCII 9), or general whitespace. We will cover the three sub-panes of the Text importer pane next.
Raw, line-based
"Raw, line-based" means that raw codes (e.g. in the Pronto Hex format) are found on lines by itself, preceded by a name, also on a line by itself. Many postings on RemoteCentral and JP1 follow this scheme. IrScrutinizer finds the "payload" (IR signal in any of the recognized formats, like Pronto Hex (also short format), UEI learned, timing lists, sendir) among other content, and imports it.
Exercise
Consider this thread on RemoteCentral. Copy the whole thread to the clipboard (Ctrl-A, Ctrl-C). Go to the Raw, line-based pane, and press Load from clipboard. There should now be 24 properly decoded signals in the tree view.
Raw
This is for importing raw formats in a spreadsheet like format (comma separate values etc). To use, select the character separating the fields as "Field separator". Select the column containing the name of the IR Signal/command, and the column containing the raw data.
Excercise
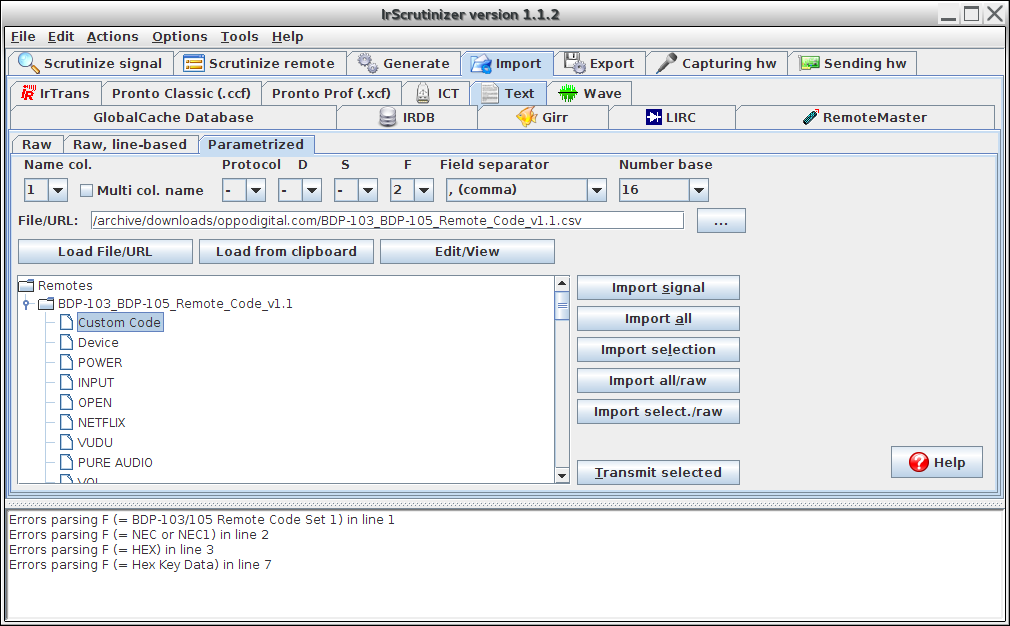
Download this Excel file containing the IR commands for the Oppo 103/105 Bluray player. Using a spreadsheet program (e.g. Excel or LibreOffice), convert the first worksheet of it to a CSV file using any suitable field separator (e.g. TAB). Using the Raw pane, select the column containing the name, and the column containing the Pronto hex data, as well as the field separator. Import by pressing the Load File/URL button. There should now be 57 signals in the tree view, all NEC1 with D=73, varying F.
Parametric
This pane imports IR signals given as protocol and parameters. As the excercise shows, some manual work may be necessary. There are combo boxes to select the column number for the name, protocol, and the parameters D, S, and F. Also the number base for parsing the numbers can be selected.
Exercise
Use the same csv file as in the previous exercise. Select the name column, and either the column for the hexadecimal command number (=F) (in which case 16 has number number base should be selected), or the column for the decimal command number (in which case 10 has number number base should be selected). Note the warnings in the console, stating that some lines did not make sense as IR signals.
Press Import all to transfer the result to the Parametric Remote. In that pane, note first that there are a few junk entries, not corresponding to IR signal, so remove them by marking the line, press the right mouse button, and select Delete selected from the context menu. Since the protocol and the D are the same for all signals, the file did not put in on every line, which means that the import missed it, and it has to be entered manually. For this, the individual lines can be edited, however, there is a shortcut: From the context menu, select Advanced -> Set protocol... and enter the protocol name (here NEC1) in the popup. Similarly, select Advanced -> Select D (deviceno) ..., and enter D (73).
Note: Unfortunately, there is a bug in version 1.1.2, affecting import of csv files using colon (:), TAB, and WHITESPACE. To avoid, use comma (,) or semicolon (;) instead.
Exporting IR Signals
IrScrutinizer does not have a "save" feature, because that would be of very limited use. Instead, there is the possibility to "export" in a number of different formats.
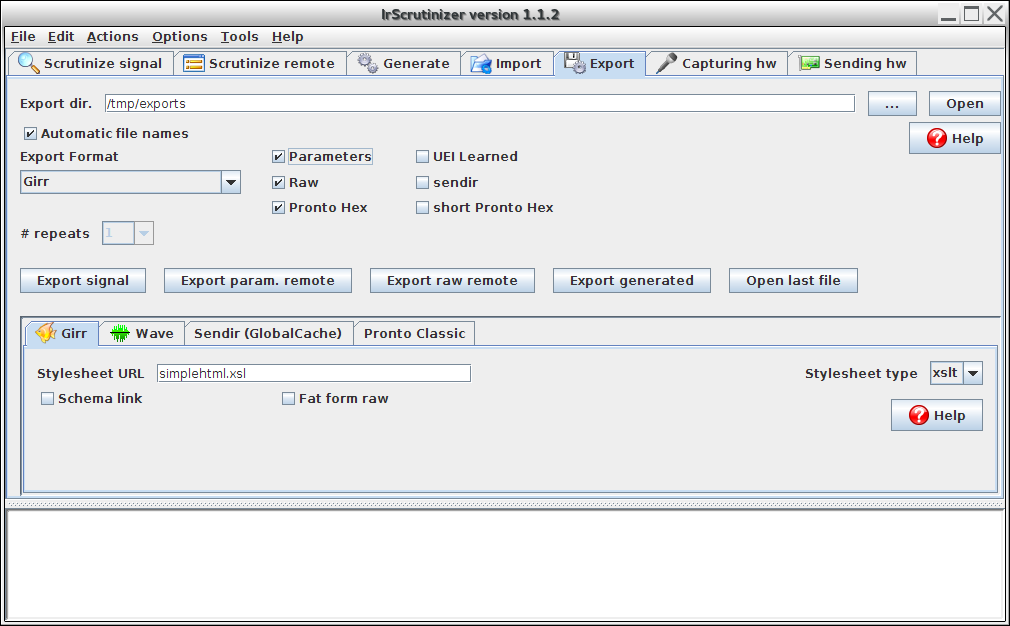
Next picture shows the Export pane.
The combo box to the left selects the export format. There is a large number of different export formats implemented, and the user can even add his own by adding them to a configuration file.
Different export formats have different properties. There are some options (see the picture) that do not make sense on some export formats. They will be disabled when selecting certain protocols.
Some formats (Girr and Text) can contain several "representation" of the same IR signal. These are the checkboxes to the right of the combo box.
There are four "things" that can be exported: The signal on the Scrutinize signal pane (the button Export signal), the Parametric remote pane within Scrutinize remote (Export param. remote), the Raw remote pane within Scrutinize remote (Export raw remote), and the signal(s) from the Generate pane (Export generated).
The lower part of the pane allows to set a few format-specific parameters.
Next we give some comments on some of the export formats.
- Girr
- This is the native format of IrScrutinizer. It is an XML file that can contain different content, as selected by the checkboxes.
- Text
- Exports the IR signals in the form of normal ASCII files, not really suitable for anything but forums and such.
- LIRC
- Exports a set of IR signals as a Lirc configuration file.
- Wave
- Exports a single IR signal as a wave file.
- Pronto Classic
- Generates a Pronto Classic CCF file, complete with one button for every IR signal. (This can be considered to be a modern replacement of the IrPanels/CCF Panels program.)
- Spreadsheet
- Generates a CVS file, fields separated by TABs. This is suitable for importing in a spreadsheet program.
- RemoteMaster
- Generates a rudimentary RemoteMaster device upgrade that can be imported in RemoteMaster, see this guide.
- Arduino *
- Generates Arduino C++ code for generating and sending IR signals, using one of the popular Arduino libraries.
- AnyMote, irplus
- Generates files for the mentioned smartphone remote apps.
Configuring Hardware for Capturing
To capture real IR signals, some sort of hardware is needed. Version 1.4 of IrScrutinizer supports Global Caché’ units with learner, Kevin Timmerman's IrWidget, Dangerous Prototype's USB IrToy, Arduinos with a connected non-demodulating sensor (see for example this), the CommandFusion learner, (Linux only) Lirc mode 2 devices, and (Linux only) /dev/lirc devices. All but /dev/lirc and the Lirc mode2 devices are capable of determining the modulation frequency of the captured signal.
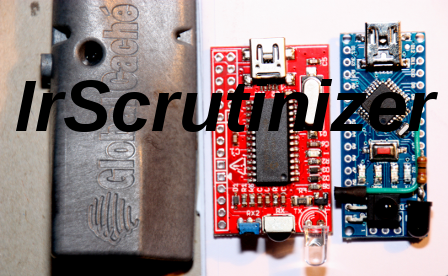
The splash image, also shown on top of this page, shows, from left to right, a Global Caché iTach Flex, an IrToy, and an Arduino Nano.
Many devices are capable both of sending and capturing. These in general have to be configured and opened on the "Sending hw" pane, but for capturing still selected on the "Capturing hw" pane.
In order to keep the tutorial nature, not all devices are described.
USB IrToy
This is configured at the Sending hw pane.
IrWidget
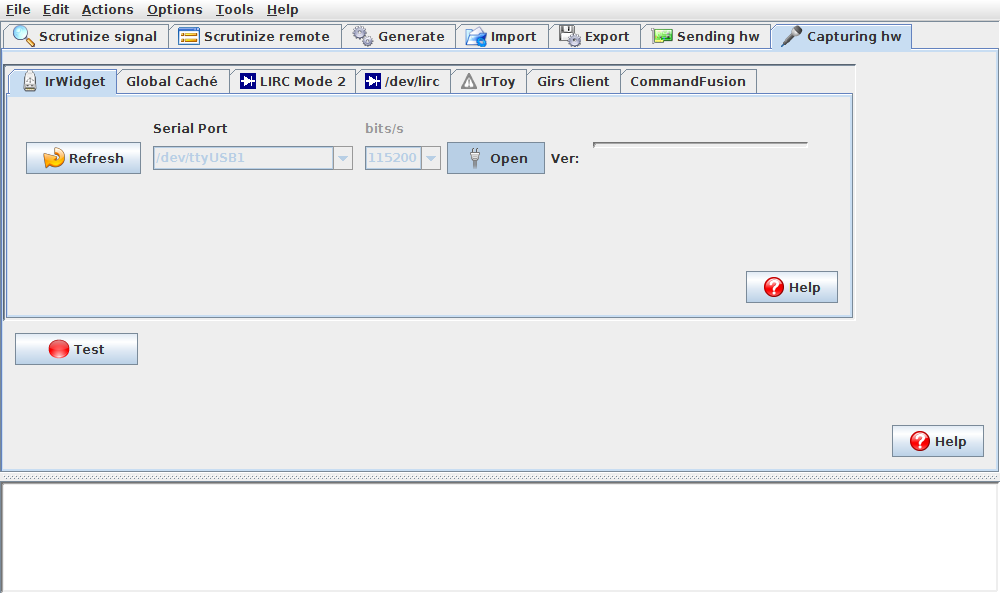
Connect the device to the computer and determine the device that the operating system assigns to it. For this, on Windows, use the device manager to find it. It should have a name like COM8: or such. (If not found, install the driver.) Using Linux, it is in general assigned a name like /dev/ttyUSB0. Now go to the IrWidget sub pane within the Capturing hw pane. Select the appropriate serial port, the one observed in the device manager or in the /dev directory. Press Open. See picture:
If Windows needs a driver, install the FTDI Virtual comm-port driver.
As the IrWidget firmware does not contain a version, the Version field is empty, as can be seen from the picture.
Arduino
Configured at the sending page.
Global Caché
Global Caché's with a build in learner, like the new iTach Flex work well with IrScrutinizer. Devices on the local network, having firmware from the last few years, are detected automatically by IrScrutinizer. Just select the desired one from the combo box.
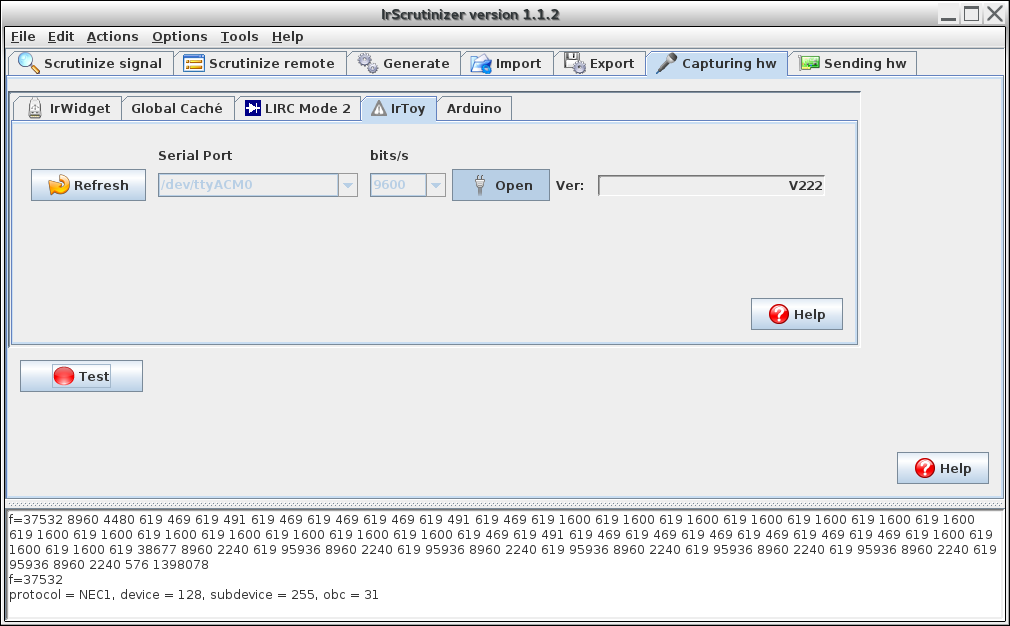
Whatever hardware has been selected and opened, it can/should be tested directly on the pane. Press the Test button and fire an IR signal at the sensor within the next few seconds. It should now print the timing of the captured signal, the measured modulation frequency, and possible decodes. See the picture:
Please note that the Test facility is just what the name says, a testing facility -- productive captures should be make on the Scrutinize signal or Scrutinize remote panes.
Configuring Hardware for Sending
To keep the tutorial nature, we only describe a few of the devices. Configuration of the other devices are in general similar.
USB IrToy
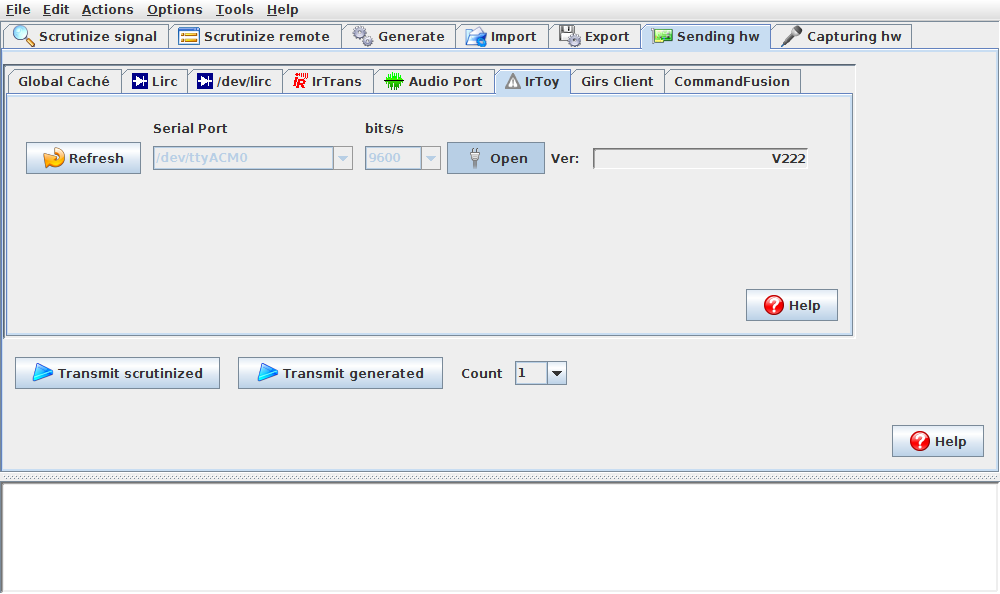
Connect the device to the computer and determine the device that the operating system assigns to it. For this, on Windows, use the device manager to find it. It should have a name like COM8: or such. (If not found, install the driver.) Using Linux, it is in general assigned a name like /dev/ttyACM0. Now go to the IrToy sub pane within the Capturing hw pane. Select the appropriate serial port, the one observed in the device manager or in the /dev directory. Press Open. The version of the firmware in the IrToy should now be reported in the Ver: text field, here "V222". (This serves as a test that the communication is working.) See picture:
Arduino
A suitably equipped Arduino (for example this project) makes an excellent IR capturer. Usage is analogous to the IrToy. If Windows needs a particular driver, visit the Arduino home page.
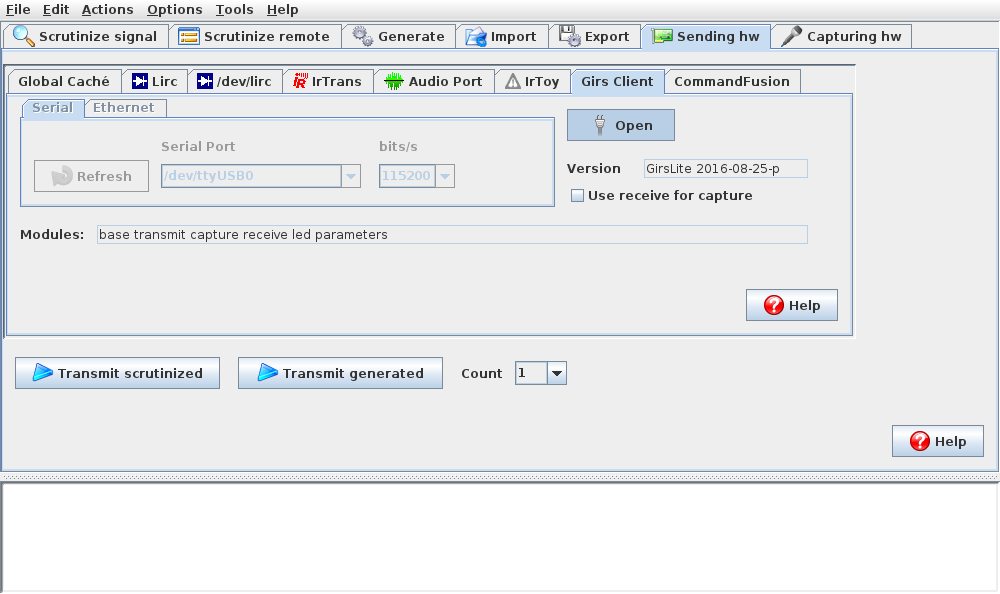
This is configured as a Girs client. A Girs client can be configure using USB Serial or using Ethernet with TCP sockets. In this tutorial, we only cover the first possibility. For this, the device is identified as above, selected, and opened. See screenshot.
Feedback
IrScrutinizer is actively developed. Your feedback and suggestions for improvements is actively solicited. Suggestions and bug report can, e.g., be left in the forum here, or raised as issues at Github (requires a Github account). Apart from this forum, I participate on RemoteCentral forum (in both cases with the user name Barf) and on the Lirc mailing list.
For feedback on this page, as well as improvements, either use the forum, or register on this Wiki.
Sources
The sources to the program are maintained at Github. Contributions (Forks and push requests) are welcome.
