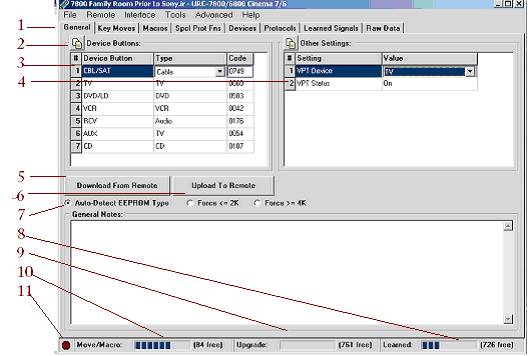
IR's General Tab
|
Back to IR Help Index |
Previous Topic IR's Menus |
Next Topic: IR's CodeSelector |
| 1 |
Note that there are tabs at the top of the screen. You use these tabs to change to the KeyMoves, Macros, Special Protocols, Devices, Protocols, Learned Signals or Raw data. |
| 2 |
These little buttons allow you to copy information into a clipboard |
| 3 |
The Device Buttons correspond to the remotes device mode buttons. The labels for these buttons come from the RDF. On some remotes like the 6012, or the 6131, there be more device mode buttons than are actually on the remote, because the signature in the remote is the same as other remotes in the family that have more physical device buttons. The type and code associated with the device button tells the remote which setup code to use to process button presses. The setup code could refer to the 4-digit code library of internal codes that came with the remote, or these could refer to device upgrades that have been installed in the upgrade area of this remote. A new feature has been added to the IR to help you select only valid codes. For this to work, the RDFs need to have a [SetupCodes] section. Most RDFs had this information added in release 1.30. If your remote's RDF has this information, when you select incorrect setup codes, they will be shown in RED. This also led to the code selection tool shown in IR's CodeSelector. |
| 4 |
The "Other Settings" are remote specific. This is where you will find features of the specific remote. The remote above has VPT (Volume Punch Through) set to the TV. This is where you might find HT (Home theater settings) and other special settings for the particular remote model. |
| 5 |
Download From the remote |
| 6 |
Upload to the remote |
| 7 |
Auto-detect EEPROM type, IR can't always distinguish large or smaller than normal EEPROM's that have been installed in a remote, and it may need to be forced. |
| Buttons 5, 6, and 7 are part of the "middle buttons" set. These buttons can be hidden by a Tools->Options selection. | |
| 8 |
This indicates the amount of memory available for keymoves, macros and fav lists. |
| 9 | Indicates the upgrades area. The upgrade area can be rolled into other memory areas. |
| 10 | Indicates if there is any learning memory available. |
| 11 |
This is the IR LED simulator. Normally when IR completes a download and releases its reset of the remote, the red LED blinks twice to indicate the remote has been re-enabled. There are some circumstances where the LED doesn't blink, to tell you that the download is complete. To compensate for this, IR simulates the LED with a little red dot at lower left of the display. When that dot blinks after about two seconds, you know the operation has been completed successfully. Otherwise you'll see an error message displayed. |
