Remote Master Manual
Contents |
Opening Screen

Preface
Open Source UEI Remote Control Upgrade Manager. This software was intended to author remote updates for your JP1 compatible remote. It was designed to replace and extend the JP1 software. The ultimate goal is to combine the function of IR and the KeymapMaster Excel spreadsheet into a single application.
Requirements
Hardware
Software
Get Started
If you haven't already, download and install Java version 6.0 or later. You can download it from the J2SE Download page. Either the Java Developer Kit (JDK) or the Java Runtime Environment (JRE) will do. Download the latest version of Remote Master from SourceForge, and unzip it to the directory of your choice, preserving directory names. Download the latest version of the Maps and Images required for RM from the Main Tools section of the File Section of the JP1 Remotes Forums. Unzip it to the folder of your choice, creating a maps sub-folder containing all the maps and images.
If you haven't already, download the lastest version of the RDF files needed for IR and RM from the Main Tools section of the File Section of the JP1 Remotes Forums.
Unzip it to the folder of your choice. It is recommended that you do NOT place it in the same directory as you placed Remote Master.
Note: You must have RDFs for all supported remotes in order for RM to work correctly when importing or loading device upgrades that were created for remotes other than the one(s) you will be using.
If you are using a version of Windows (95/98/NT/XP/Vista/Windows 7), double-click on Setup.vbs. This will create shortcuts in Start > Programs > Remote Master for your use. Feel free to send them to you Desktop or copy them to your Quick Launch toolbar. File associations are also created for .rmdu and .rmir file, so you can just double-click on them directly.
That's it, Remote Master is now ready for your use! There are a few different ways to start Remote Master:
Click on the Remote Master or RMIR shortcut in Start > All Programs > Remote Master Non-windows users should use the rmaster.sh and rmir.sh scripts.
Double-click on a .rmdu or .rmir file. In your browser, click on a link to a *.rmdu or *.rmir file. There is a short tutorial available for RM. See JP1 - Just How Easy Is It? - RM-IR Version
User Interface
Command Bar
The Remote Master menu bar provides access to general functions and options.

File
The File menu provides ways to load and save Device Upgrade files. Below are the menu items available, and what they do:

- New - :Set all upgrade information to default values, as though starting from scratch.
- Open... - Bring up a file dialog allowing you to load an existing RemoteMaster Device Upgrade file (*.rmdu). To load a KeymapMaster Device Upgrade file (*.txt), change the Files of type: field to KeyMapMaster device upgrade files.
- Save - This menu will save the device upgrade to a file. This item will be diabled unless a RemoteMaster Device Upgrade file was loaded, or the "Save as..." item has been used.
- Save as... - Save the device upgrade to a different file name. The default file name will be the name of the file loaded, or the name used for "Save as...", or the contents of the Description field.
- Import from Clipboard - Imports a device upgrade from the clipboard. This is useful if you click on a link to a device upgrade (either KM or RM), and your browser simply displays the text of the upgrade. Simply use the context-menu (right-click) to Select All and then Copy the entire upgrade to the clipboard.
- Recent - Lists up to the 10 most recently opened, or saved, RM device upgrade files.
- Exit - Exit Remote Master
Options
The Options menu provides ways to customize Remote Master

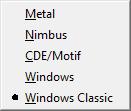
- Look and Feel - Allows you to select the over all look and feel used by RemoteMaster. Most Windows users will want to use the Windows Look and Feel, but I recommend the Metal Look and Feel. The reason for this is simple: the Windows Look and Feel does not highlight the current cell in the Functions panel.

- Font Size - Allows you to increase or decrease the size of the fonts used by RemoteMaster.

- Prompt to Save - Allows you to specify when Remote Master will prompt you to save your Device Upgrade. The valid values are:


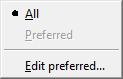
- Remotes - Allows you to choose the set of remotes that RemoteMaster will display. Your choices are All, meaning all remotes for which RemoteMaster can find Remote Definition Files (RDFs), or Preferred, meaning only those remotes that are in your preferred list.

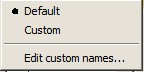
- Function names - Allows you to choose the function names used when creating a new upgrade. Your choices are Default, meaning the same as KM, or Custom, meaning your own custom list.
- You can edit the list of custom names using Edit custom names.... When editing the custom names, there is a button to import the names of the buttons on the current remote.

- Show remote signature - This option display's the remote's signature in () after the remote name. This if very helpful when dealing with remotes with confusing names like the Atlases or the Comcast remotes.
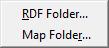
- Folders - If you have decided to reorganize your file system after the initial RM installation, use this option to locate the RDF's or Map's and Images for RM and RMIR.
Advance

- Primacy - This option allows users to choose whether to preserve the OBCs or the Hex when making protocols changes. Typically this should be should be set to OBC, to make sure the signal is correct. Hex is executor specific, so preserving the Hex can change the output.
- Edit Protocol - This option allows the manual settings for the current protocol to be changed.
- New Manual Settings - Sometimes a protocol requires a custom executor. A custom executor may be needed for an unrecognized signal, or it might just be a simple tweak to control the number of repeats being sent. Currently we use Protocol Builder (PB) a Microsoft Excel Worksheet to compile a new executor, and then use this option to import the protocol. See Adding a PB Protocol to Remote Master to see the step by step process.
- Import Raw Upgrade - If you found an upgrade posted in the forum, but the RDMU or KM TXT file is not available, by pasting the guts of the upgrade, and identifying the remote it was created for, RM can reverse engineer the upgrade.
- Import Binary Upgrade -This creates an RDMU from a Slingbox BIN file.
- Export Binary Upgrade - This creates a BIN file for use with a Slingbox or similar device.
Help

- Readme
- Tutorial
- Home Page
- Forums
- Check for updates
- About...
Definition Header

- Description – Fill this field in with the brand and model of the device being controlled
- Remote – This field must be filled in with the target remote. If this field is incorrect the upgrade will not function correctly. Failing to select the correct remote is the most common newbie error.
- Device Type – The device type determines which keys will be available without needing to use keymoves. The device type may effect things like volume punch through, but does not determine what type of equipment can be controlled.
Tabs
![]()
Setup Tab

- Setup Code – The setup code needs to be a number between 0000 and 2047 for most remotes, however some of the newer remotes allow a range of 0000-4095.
- Protocol – The protocol is selected from the drop down. Each protocol has a Protocol ID or PID.
- Protocol Parameters – The protocol parameters will change depending on the protocol selected. Fill in the device numbers, sub devices that were found in the signal decode. Note a zero is not the same as a blank. Do not fill in a sub device if none was reported in the decode. Examine the decode carefully. For this example the decode would be Nec1 1.252 or Nec1 Device 1 sub device 252.
Functions Tab

The Function Tab is used to create a list of all the buttons on the OEM remote.
- # - is the line identifier.
- Name – Name represents the labeling on the OEM remote. When you are creating the function list, make sure to note double functioning. Often your OEM remote buttons are used to do different functions. They may have small print on or above the buttons, that indicates those functions. That is important information. If you don’t have the OEM remote in front of you its difficult to imagine for example, that the “pause button” for playback, might also be the “up button” when you are in working in the menus. The best way to handle this is to use a compound function name (eg, "pause/up_arrow").
- EFC5 – This column only appears for remotes that can handle 5 digit EFCs. Remotes manufactured prior to 2005 only do 3 digit EFCs.
- EFC – When signals are decoded an EFC may be reported, but if you are using a non-standard protocol executor, the EFC is unreliable, and you should use the OBC instead.
- OBC – The Original Button Code, is the function to be represented in the infrared signal. Use this column for data entry when possible.
- HEX – RM allows entry in the Hex column. This is useful to protocol developers, but leads to confusion to new users because this hex does not correspond to the hex reported in a LIRC file or a manufacturer’s infrared spec.
- Action Bar
- New- Inserts a new line
- Delete - Deletes the current line, (might not be active if the function has been assigned to a button on the buttons tab.
- Clean Up - Deletes all lines with now function codes.
- Up - Moves the highlighted line up in the list.
- Down - Moves the highlighted line down in the list.
- Copy
- Paste
- Paste (IE) - Internet Explorer handles the clipboard differently than most programs. This allows for pasting from Internet explorer.
External Functions tab
 Sometimes you need functions from another setup code/upgrade in order to get a complete function list. These functions would be setup as keymoves. The External Functions tab allows these to be included when you assign functions to buttons. The grid will contain all the information that is necessary to setup a keymove. Device/Setup code
- Grid
- # - Line number
- Name – Function name
- Device Type – Device type of external setup code.
- Setup Code – External setup code.
- Type – Specifies the type of data is being entered EFC/Hex
- EFC/Hex – information for the keymove function.
- Notes – Notes about the function
- Action Bar
- New – Adds a new line.
- Delete – Deletes the current line
- Clean up – Deletes any functions that do not have a function code
- Up - Moves the selected line up
- Down - Moves the selected line down
- Copy
- Paste
- Paste (IE) - A paste that handles an IE (Internet Explorer) clipboard.
- Import – Opens an upgrade file to add the "available functions"
- The Import screen looks like this.

- Import Controls
- Select all
- Select None
- Toggle - Reverses all the selection marks
- Ok - adds the selected functions to the external function grid
- Cancel - aborts selections.
- Import Controls
Buttons tab
 RM has two tabs for assigning functions to buttons. The Buttons tab is a textual interface, the Layout tab is a graphical interface. On this tab, you use have three methods of associating functions with a button.
- 1) Press the Auto Assign button attempts to match the functions to the buttons by name.
- 2) You can drag and drop a function from the Available Functions area to the Function cell, or the Shift cell, or xShift cell if that feature is available. .
- 3) You can double click on a function, shift or xshift cell and then pick the desired function from a list.
- The Grid
- Button - These cells contain a list of buttons on the remote,
- Function – These cells contain the function name assigned to the button.
- Shift refers to an alternate function that is accessed by pressing a special key such as SET prior to pressing the button
- Available Functions – is a list of the functions that were entered on the functions tab.
- Action Bar
- Auto Assign – attempts to assign functions by matching up the name of the function to the button.
- Remove – Deletes the function from the current cell
Layout tab
 RM has two tabs for assigning functions to buttons. The Layout tab is a graphical interface, the Buttons tab is a textual interface.
On this tab, buttons with assigned functions are colored in yellow, and buttons that are present in the key map for the selected device type are outlined in orange. When a button is selected it will be outlined in white, and the button name and associated function name will appear in the field. On this tab functions can be assigned to buttons in 4 different ways:
RM has two tabs for assigning functions to buttons. The Layout tab is a graphical interface, the Buttons tab is a textual interface.
On this tab, buttons with assigned functions are colored in yellow, and buttons that are present in the key map for the selected device type are outlined in orange. When a button is selected it will be outlined in white, and the button name and associated function name will appear in the field. On this tab functions can be assigned to buttons in 4 different ways:
- 1. Press the Auto assign button to get some functions automatically assigned. The ones that get assigned automatically are the ones where you used the default function names and there's an equivalent button on your JP1 remote for that function. You are under no obligation to accept these default assignments.
- 2. Drag-n-drop a function onto the desired button
- 3. Right-click on a button and select the desired function
- 4. Click on a button (it will turn white), then double-click the desired function.
- Mode
- Normal – Normal function.
- Shift - refers to an alternate function that is accessed by pressing a special key such as SET prior to pressing the button
- xShift - refers to an alternate function often available when an extender is installed. This alternate function is accessed by pressing a special button prior to pressing the named button.
- Available Functions – is a list of the functions that were entered on the functions tab.
- Action Bar
- Auto Assign – attempts to assign functions by matching up the name of the function to the button.
- Remove – Deletes the function from the current cell
Key Map tab
 The purpose of this tab is to provide print capability for documentation purposes. The grid is described under the Buttons tab.
Output tab
 The output tab is used to transfer an upgrade from RM to IR.EXE. If you are using RMIR, this process is automated.
To transfer the device from RM to IR follow these steps.
- 1. Switch to IR.
- 2. Navigate to the Device Tab
- 3. Select Add
- 4. Switch to RM
- 5. Press the Copy button above the Device Upgrade
- 6. Switch back to IR
- 7. Paste the upgrade
- 8. Press Ok.
Note that the Protocol Upgrade box is empty and there is a message that "Upgrade Protocol NOT REQUIRED" in the example above. If there had been a protocol in the box, the protocol would have to be transferred to IR.exe.
- 1. Switch to IR.
- 2. Navigate to the Protocol Tab
- 3. Select Add
- 4. Switch to RM
- 5. Press the Copy button above the Protocol Upgrade
- 6. Switch back to IR
- 7. Paste the upgrade
- 8. Press Ok.