How to Install a Custom Remote onto the Slingbox
Written by: Al Richey
The Slingbox comes with several hundred remote control codes to operate thousands of different devices. Unfortunately, there are times that you may have a device that they do not support, or you have a remote control for a special device, like a surveillance camera. In that case you need to install a custom remote code on the Slingbox to control your device. This article explains how to install custom remote BIN files on the Slingbox It has 3 sections, one for the Slingbox M1 & M2, one for the Slingbox 350 & 500 (Now called SlingTV) and one for the older Slingboxes (Classic, AV, Pro, Solo, & Pro-HD), as they all use slightly different methods.
Contents |
Introduction
If you are not familiar with custom remote bin files they are specially made files that you can install onto your Slingbox for controlling devices that are not included in the supplied Slingbox remote controls. We have hundreds of them available, in our Download Pages for all sorts of devices. If you have tried the Slingbox supplied ones and can’t find one that works we recommend you search or list and try one available here. If you do not see one for your device in the list you can check the JP1 forums that also carry a large number of Custom Remotes.
The remote files are called BIN files because the file-name extension ends in .bin (on may Windows machines they will show as being associated with VLC, you can ignore this). When downloading remote codes you may find several different ones contained in a Zip file. For example: S2010_PL.BIN and S2010_RV.BIN. For most devices you will need only the xxxx_PL.BIN file. The xxxx_RV.BIN file is used for older European Slingbox Solo models. So if you have one of those you need to try both files just in case. Note that you must NOT rename these files, it is essential the file name stays as issued.
If you have any problems installing these files please do NOT just report back it ‘doesn’t work’, that is totally useless for someone trying to understand what is going on. So please report all of the following:
- What model Slingbox do you have?
- Was there any error message after you typed in the Code and tapped the Test button (or selected the file and tapped ‘Continue’ on the M1 & M2)?
- Did you give the commands plenty of time to react? (I have a DVR that takes about 6-8 seconds to power up/down)
- If you are using a Solo did you try both BIN files?
- After completing the setup do any of the buttons work?
- If you are installing on a Solo or Pro-HD or older box that uses an external IR Blaster, have you used a Digital Camera or Mobile Phone Camera to confirm the IR Blaster is actually firing when you tap the Power button? (Watch the tip of the IR Blaster through the viewfinder while you tap a button. You should see a white (not red) flash. Test it on a real remote so you know what you are looking for). If you are using a 350/500/M1/M2 have you tried using the external blaster?
- Have you experimented with the placement of the IR Blaster? On some devices this is critical so don’t give up too quickly. Try shining a flashlight at the front of the receiver and see if you can see the IR receiver behind the smoked glass.
- Are you sure the device is working correctly using the real remote?
- Are you sure your device is set to use IR ? Many boxes can operate on RF or IR and if it is set to RF then the Slingbox will not affect it.
- If you have a device that supports multiple remote addresses (DirecTV, Dish Network, Tivo…) are you sure the remote address is set to the default ?
- Have you tried resetting the Slingbox. ? This has been found to help.
- Do you have access to a Logitech Harmony Universal Remote? If so let me know.
Once the BIN file has been downloaded to your Slingbox it is not required anymore and can be deleted. The fact that it now resides inside your Slingbox means that any viewing system you use (Slingplayer, newwatch.slingbox.com, SlingCatcher, Facebook, SPMobile….) will use that remote.
If you have any recommendations to improve this guide, just let us know.
Now go the appropriate set of instructions:
Installing a Remote BIN file on the Slingbox M1/M2
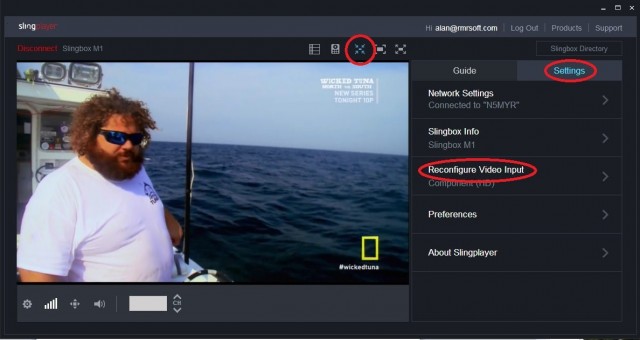
After obtaining an XXXXX_PL.BIN remote bin file and putting it somewhere on your Hard Drive (I recommend the root folder C: to make life easier), you should open up the Desktop Slingplayer. Once it is running select the ‘Standard’ View and then click on Settings and the Reconfigure Video Input.
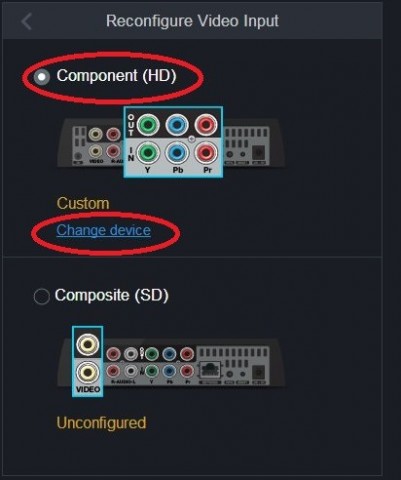
Then select the Input you wish to configure and click on the Change Device Link
You will be taken through the Slingbox Naming, Location and TV Provider screens again. Seems unnecessary to ask the Name and Location but that is how it is designed, hopefully it will be improved in later versions.
Note: These questions are purely for the TV Guide, they have absolutely nothing to do with the Remote. If you are somewhere other than the USA and Canada where the TV Guide is not supported just put random values in. I use USA and 90210 (Beverly Hills J)
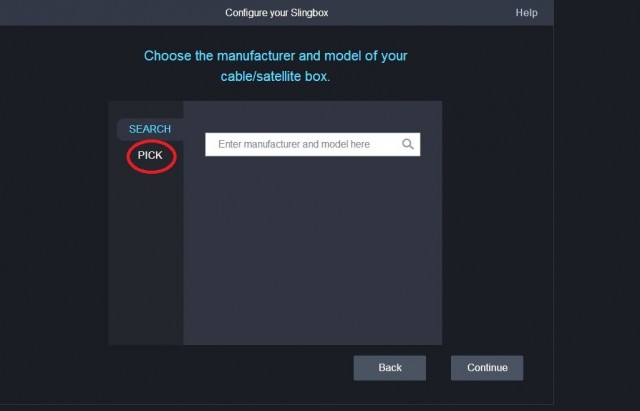
Now, on the next screen select the ‘Pick’ option.
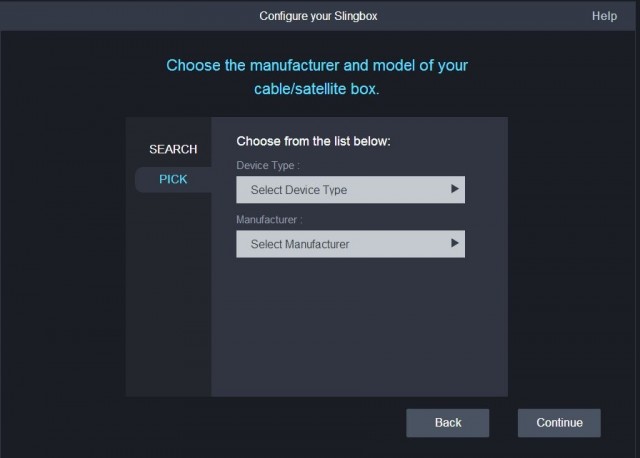
This brings you here
First select the Device Type.
That is not necessarily the type of your device, it is defined by the first letter of the BIN file. If it is a ‘C’ then select Cable TV, ‘S’ select Satellite and ‘V’ select PVR. NEVER select DVD Player as that gives you a very poor remote image without many of the buttons.
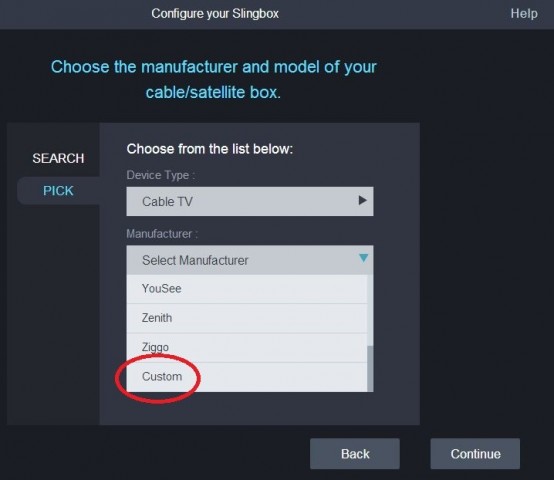
Now Select the Manufacturer. If the code you are installing is between 2000-2047 then just scroll to the bottom and select Custom and then Continue. (This is because they use the default remote image).
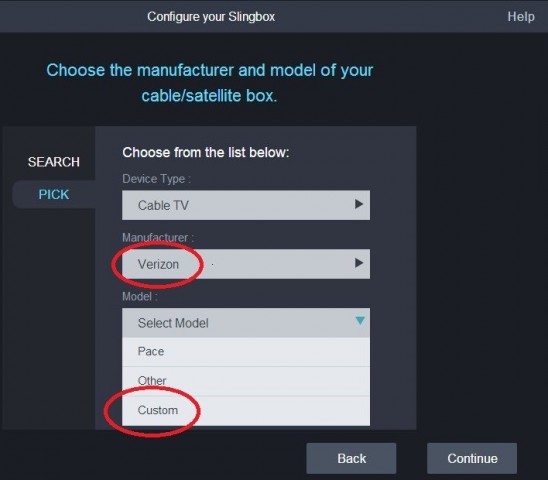
If the code is between 0000-1999 then select the Manufacturer of your device and when the Model Number drop down appears again scroll to the bottom of the list and select Custom and then Continue. With a bit of luck this will give you a realistic remote image.
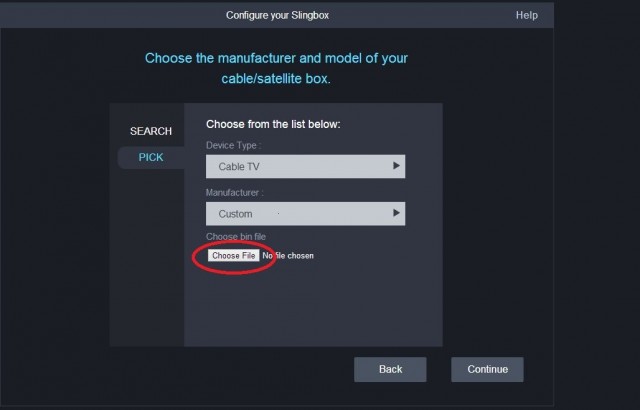
So that brings you to this screen.
Just click on the Choose File and you will be presented with a standard File Selector box. Just navigate to where you stored the BIN file and select it.
Note: There is no error checking done on this file so if you select the wrong one, or do not select a file the system will try and install it and then crash, so make sure you select the right file.
The file name will appear next to the box and you can then press Continue.
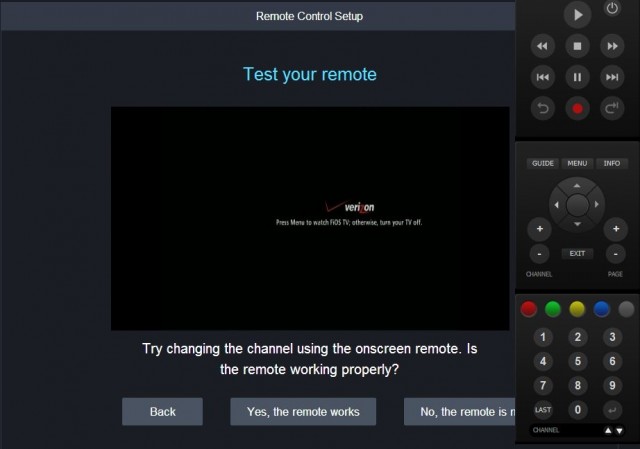
After a bit you should get a picture and the request to test your remote, so tap on Continue and follow the instructions.
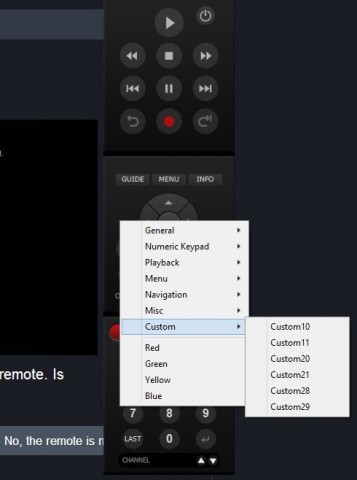
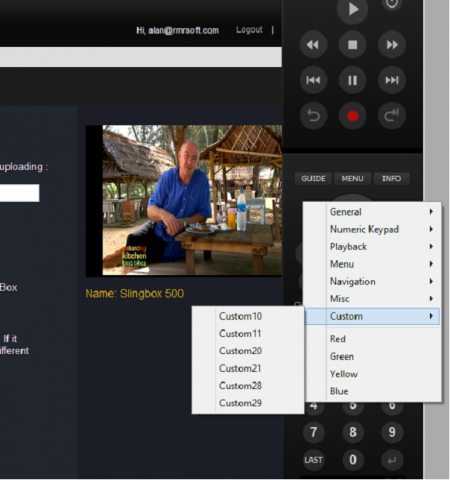
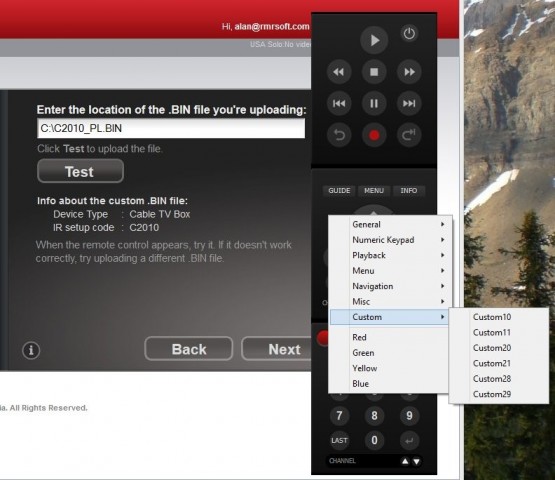
And if you test the buttons you should find it now operates your device. And if you right-click on the image and select Custom you might find other buttons defined. What each one represents will be covered in the Readme file you downloaded.
If the remote does not work go back to the checks I suggested at the beginning of this guide and see if they help. Otherwise confirm the Remote is working and tap the Watch TV button.
Installing a Remote BIN file on the Slingbox 350/500 (SlingTV)
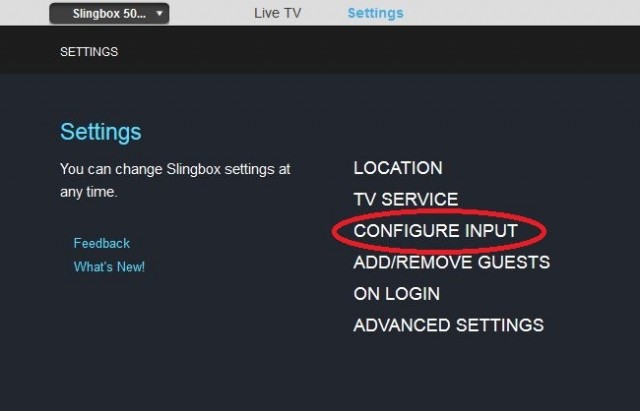
After obtaining an XXXXX_PL.BIN remote bin file and putting it somewhere on your Hard Drive (I recommend the root folder C: to make life easier), you should open up your web browser and navigate to newwatch.slingbox.com. Once there select the Slingbox you wish to setup then click on Settings.
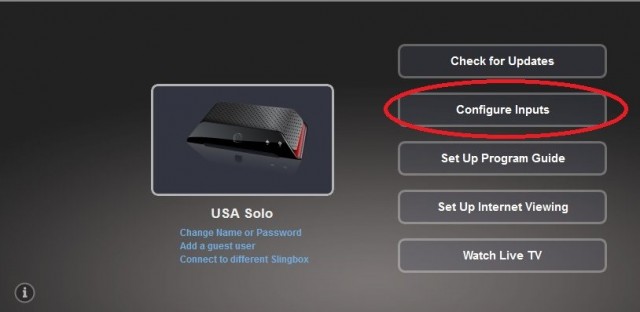
On the next page click on Configure Inputs.
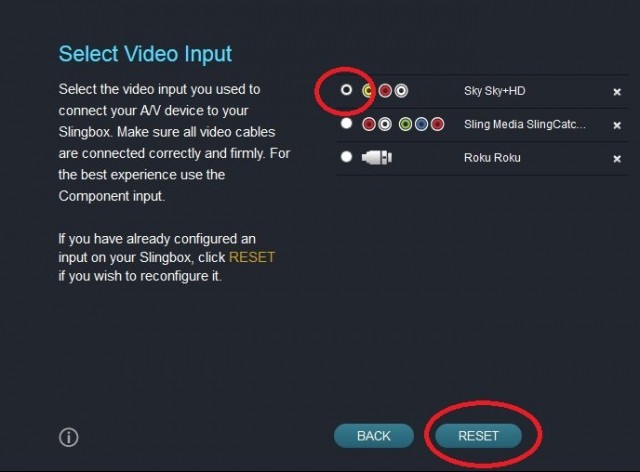
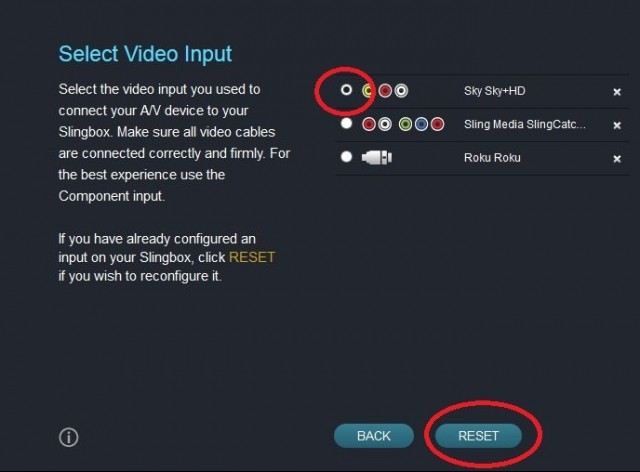
Now select the Input you wish to configure (The radio button with a black centre). If the input has been previously configured then you will need to tap the ‘X’ next to the input to reset it or the Reset button at the bottom.
In this case I am going to configure the Composite input so I selected that, tapped the Reset button and then tapped the Next button.
Now work through the ZIP code and TV Provider screens. Please note this has NOTHING to do with the remote, this is to setup your Program Guide. For any non-US owners, these screens are irrelevant but you still have to complete them. I use a ZIP code of 90210 (Beverly Hills) and select the ‘No provider’ option. Then you move onto the next screen to actually setup the Remote.
So click on the Pick option to get the next screen.
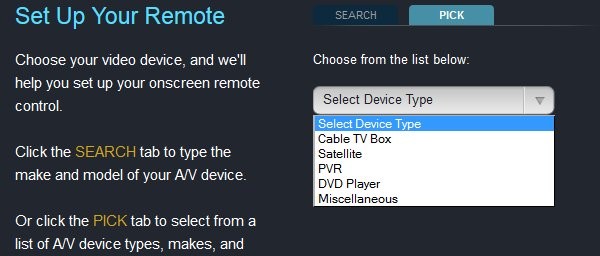
First select the type of device.
This is NOT the type of device you are installing. To get the right one, look at the BIN file code. If it starts with an ‘S’ select Satellite, if it starts with a ‘C’ select Cable TV Box and if it starts with a ‘V’ select PVR. NEVER select DVD, even if you have a DVD as this will result in a very poor Remote image.
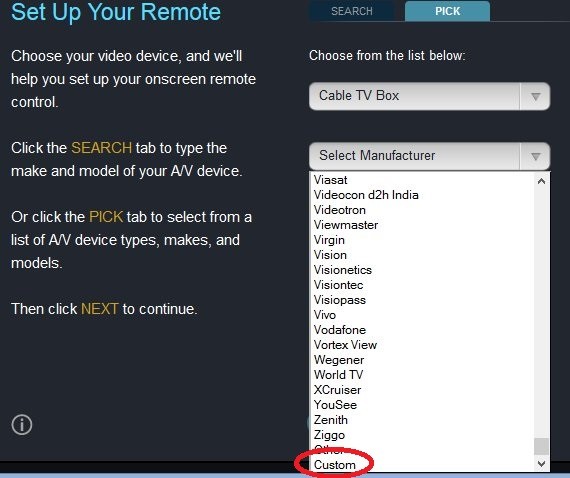
The next step depends on the code number. If your BIN file has a code between 2000-2047 (which will use the Default Remote image) then open the ‘Select Manufacturer’ drop down box, scroll down to the bottom and select Custom.
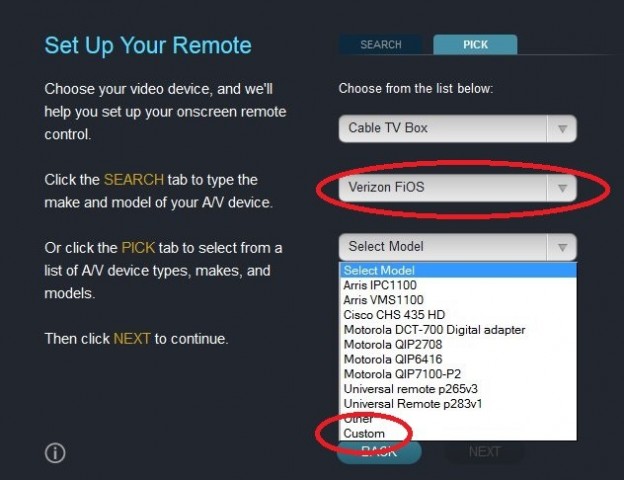
If the code is between 0000-1999 then open the ‘Select Manufacturer’ drop down box, select your Manufacturer or TV Provider, then when the ‘Select Model’ drop down appears scroll down to the bottom and select Custom. This should give you a realistic remote image for the Manufacturer/TV provider
Then press Next.
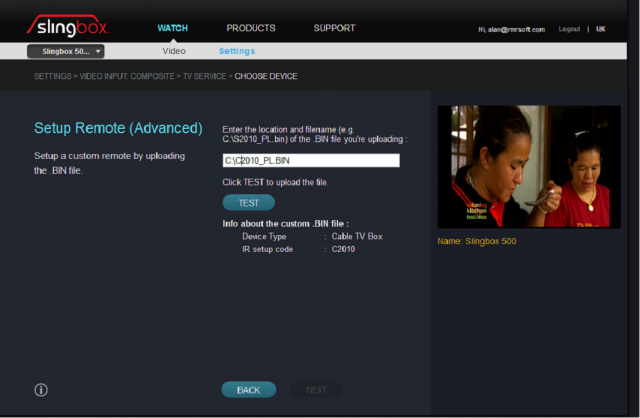
Now type in the FULL pathname and filename for the BIN file you wish to install. You can see now why I suggest putting the BIN file into the root directory, so you don’t have to type in a long file path with the possibility of making mistakes.
Ensure you get the backslash correct (not a forward slash) and that everything is in upper case.
Now tap the TEST button to download the BIN file to the Slingbox.
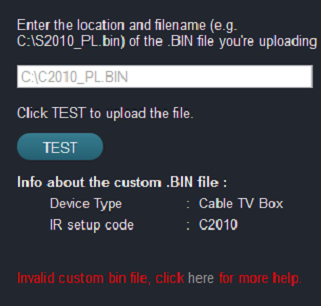
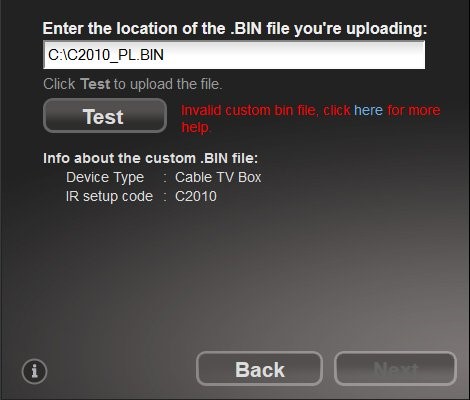
If you get this error message then the first thing to realise is that it does not mean ‘Invalid Custom BIN file’. It actually should read ‘Custom Remote BIN file not found’, so the likelihood is that you have not typed in the file path and file name correctly.
(Amazingly, the setup does not check the validity of the BIN file so I have no idea why Sling used this message, it makes no sense. I have complained about it for months but they don’t seem to be interested).
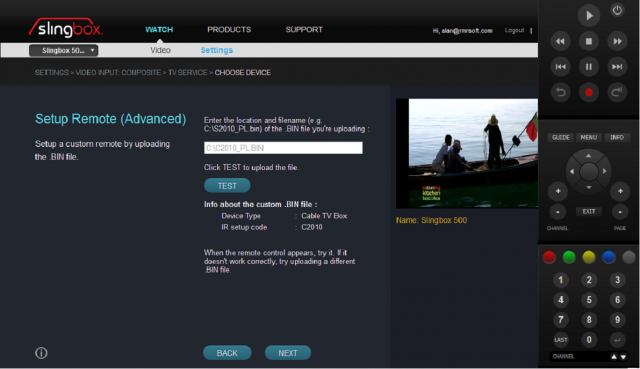
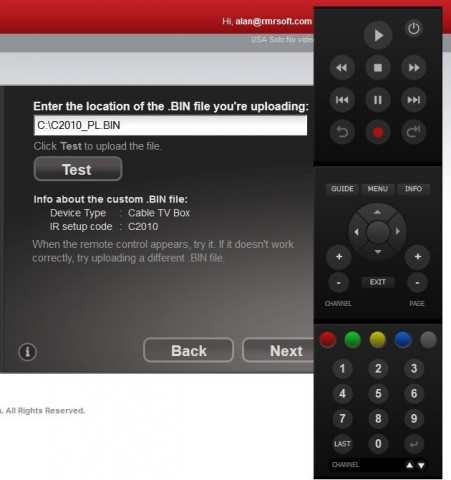
Once you have the correct location typed in the system should now install the BIN file and then download the Sling Remote image as shown in the next screenshot. (That is the default image, for codes between 0000-1999 you should get your realistic image)
And if you test the buttons you should find it now operates your device. And if you right-click on the image and select Custom you might find other buttons defined. What each one represents will be covered in the Readme file you downloaded.
If the remote does not work go back to the checks I suggested at the beginning of this guide and see if they help. Otherwise tap Next and then Watch and you are complete.
Installing a Remote BIN file on legacy Slingboxes
Remember: If you are installing on a Pro-HD you need only the XXXXX_PL.BIN file. If you are installing on other boxes you may have to try both the XXXXX_PL.BIN (USA) and the XXXXX_RV.BIN (European) files (And ignore your actual location, many European Slingboxes were actually manufactured in the USA).
After obtaining the remote bin file and putting it somewhere on your Hard Drive (I recommend the root folder C: to make life easier), you should open up your web browser and navigate to setup.slingbox.com. Once there click on the ‘Get Started’, select the Slingbox you wish to setup then select Configure Inputs.
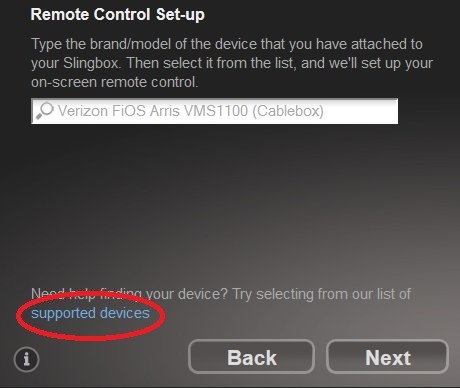
After selecting which input you are using, you will be brought to the ‘Remote Control Setup’ page. On this page click on the ‘supported devices’ link at the bottom (I know this is illogical, as you are installing an unsupported device, but that was how Sling decided to implement it).
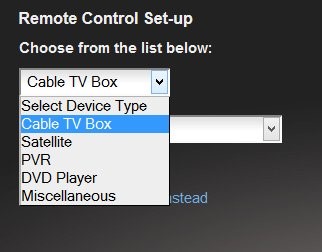
Now select the type of device.
This is NOT the type of device you are installing. To get the right one, look at the BIN file code. If it starts with an ‘S’ select Satellite, if it starts with a ‘C’ select Cable TV Box and if it starts with a ‘V’ select PVR. NEVER select DVD, even if you have a DVD as this will result in a very poor Remote image.
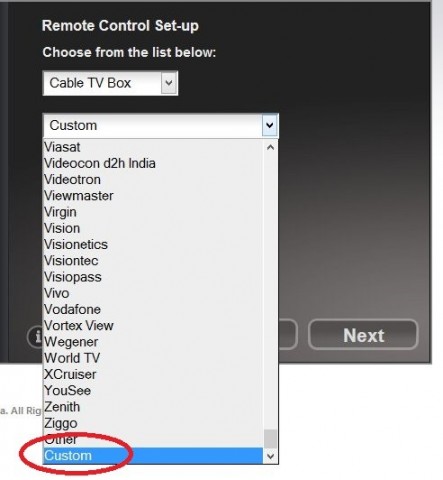
Now open the ‘Select Manufacturer’ drop down box, scroll down to the bottom and select Custom.
Then press Next.
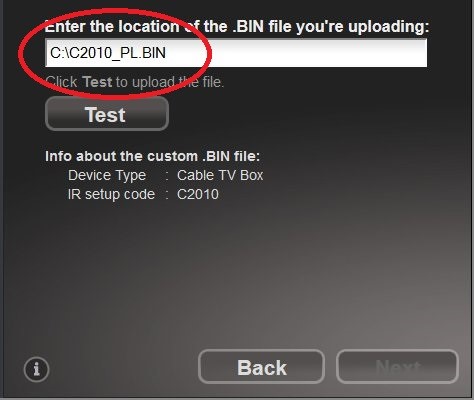
Now type in the FULL pathname and filename for the BIN file you wish to install. You can see now why I suggest putting the BIN file into the root directory, so you don’t have to type in a long file path with the possibility of making mistakes.
Ensure you get the backslash correct (not a forward slash) and that everything is in upper case.
You can then test the remote. If it does not work you can go back and try the other RV or PL BIN file.
If you get this error message there are 2 possibilities. The first is that you are using the wrong (RV or PL) file for your Slingbox, so try the other. For the other possibility you have to realise that it does not mean ‘Invalid Custom BIN file’. It actually should read ‘Custom Remote BIN file not found’, so the likelihood is that you have not typed in the file path and filename correctly. Not sure why Sling did not use a more appropriate message in this case.
Once you have the correct location typed in the system should now install the BIN file and then download the Sling Remote image as shown in the next screenshot. (That is the default image, for codes between 0000-1999, you might get your realistic image).
And if you right-click on the image and select Custom you might find other buttons defined. What each one represents will be covered in the Readme file you downloaded.
If all is good you can now control the device connected to your Slingbox. You may be taken through a few more setup screens before it completes. One thing worthy of note is that non-US/Canada customers sometimes get asked to input ZIP codes and TV Providers. The service provider information is used ONLY for the Electronic Program Guide and is not needed for viewing or controlling your Slingbox. So just ‘lie’ to the system. I tend to use a ZIP code of 90210 (Beverly Hills) and a random TV Provider.
If the remote does not work go back to the checks I suggested at the beginning of this guide and see if they help. Otherwise tap the Watch Live TV and you should be good to go.
